Get in touch with UD Packaging Company

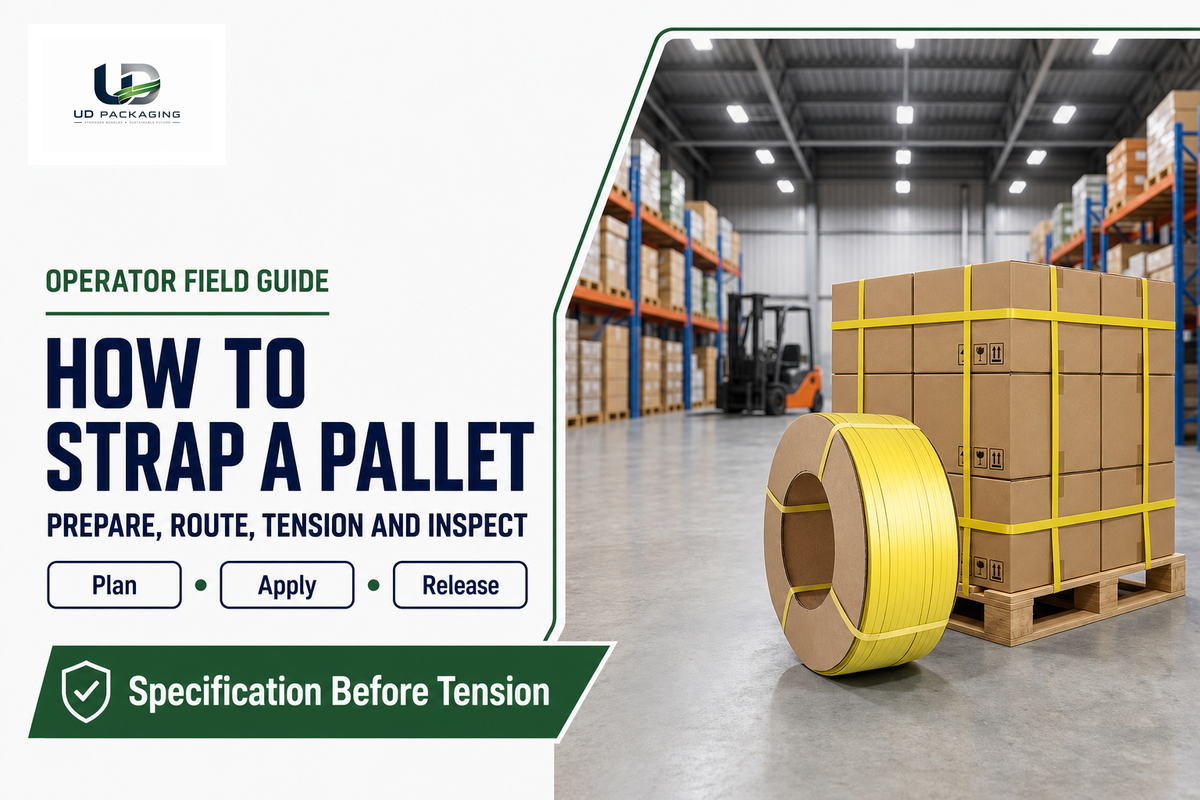
How to strap a pallet is a controlled process that begins with an approved load-unitization specification, a sound pallet, and a supported load. Route the specified strap on its defined track, protect vulnerable contact points, use the matched tool and joint, then inspect the pallet before movement and again at defined handling or storage triggers. The final check is an operator screen, not proof of distribution performance. This guide focuses on application, observation, diagnosis, and rework; it doesn’t choose the strap system for you.
Short answer: Prepare the pallet and load, confirm the approved strap-joint-tool combination, route the strap, protect edges, apply the validated setting, complete the joint, inspect five zones, and record an internal release, rework, or revalidation decision. Stop if the pallet, load, equipment, or specification is unsafe or undefined.
Scope before the first step
This is a pallet-unitization procedure. It isn’t a vehicle tiedown method, hazardous-material compliance check, structural test, or hoisting instruction. Standard transit banding isn’t lifting gear. Follow the approved packing specification, the tool manufacturer’s instructions, applicable rules, and the site safety program.
What Pallet Strapping Must Accomplish Before You Begin
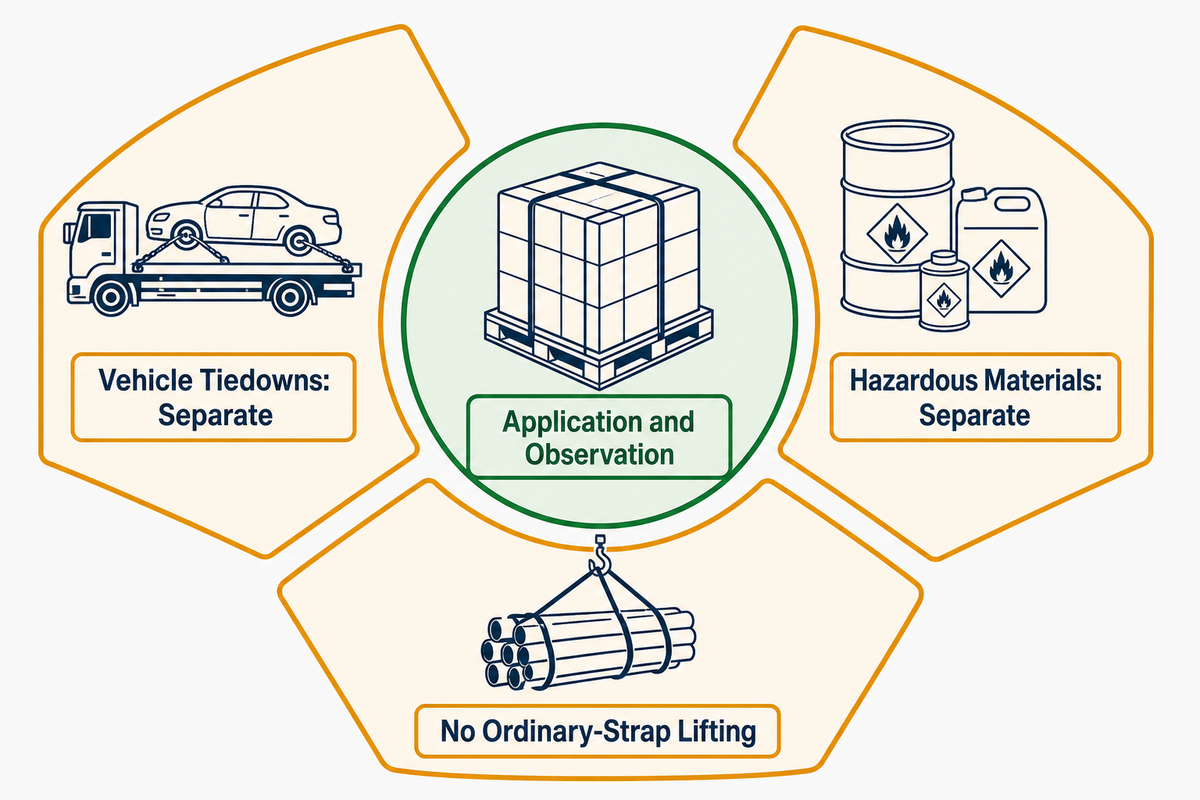
Pallet strapping can add cohesion to a stack and connect it to the pallet, but it can’t certify a damaged pallet, unsupported arrangement, or unknown shipping condition. Before work begins, define the approved unitization specification and the limits of this procedure: application and observation, not transport, lifting, or regulatory validation.
A NIST paper published in 2011 from the 2010 PerMIS workshop explains that wrapping and strapping can hold a mixed stack together and fasten it to the pallet. This older mechanics example corrects a common overstatement: the load doesn’t have to possess every part of its final cohesion before a strap touches it. It isn’t presented as a current operating standard. Strapping still can’t repair a cracked deck board, unsupported product, or an arrangement outside the pallet’s rated application.
OSHA 1910.176(b) requires tiered stored materials to be stable and secure against sliding or collapse. Use that as a stop boundary, not as a strap-count formula. The required number of packaging loops and their path belong to the approved specification. A station release under this guide does not authorize tiered storage; stacking height, blocking, interlocking, and storage arrangement require their own approved plan.
For covered solid-wood packaging entering or transiting the United States, a station release does not establish import eligibility. APHIS says regulated wood packaging material must meet applicable ISPM 15 treatment and marking requirements. Confirm the destination-specific phytosanitary rule and records through the responsible compliance function; this guide neither validates treatment nor approves an IPPC mark.
Do not cross these boundaries: FMCSA vehicle tiedowns follow separate working-load and count rules. Hazardous-material packages and overpacks have separate marking, labeling, packaging, and placarding duties. Ordinary transit straps must not be used for lifting.
Only a separately engineered lifting arrangement may use rated banding under a rule that expressly permits it; this article provides no hoisting method.
ASTM D3950-23 is cited here only for nonmetallic strapping and joining methods. It does not establish steel-strapping requirements. ASTM D4675 is the broader application guide for steel and nonmetallic strapping, yet it also requires situation-specific review and user testing.
Confirm the Strap, Joint, Tools, and Stop Conditions
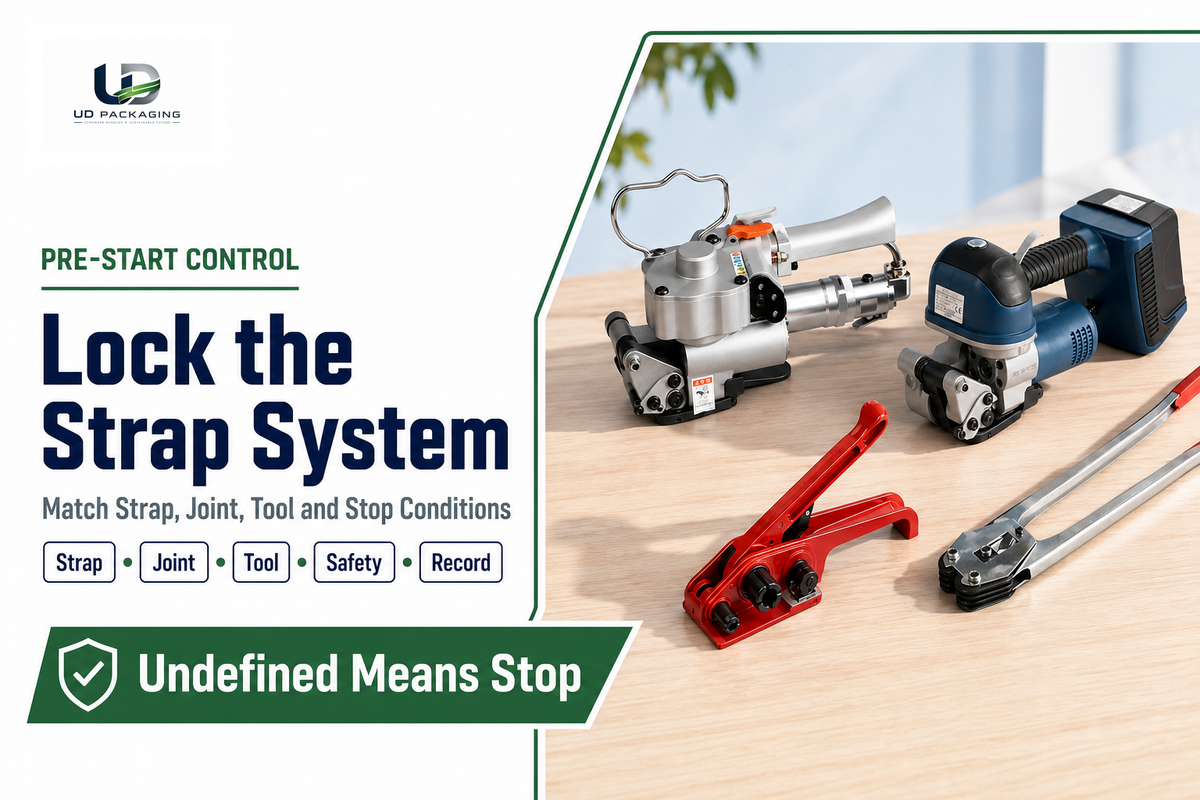
Start only when the packing specification identifies the strap, joint, tool, edge protection, track layout, setpoint or control method, and acceptance criteria. Match every item before energizing a manual, battery, pneumatic, semi-automatic, or automatic station. An undefined combination is a technical-review stop, not an invitation to improvise.
The hazards below are examples, not a complete risk inventory. Before work, the employer’s competent or qualified owner must assess the actual load, work area, material supply, equipment, energy sources, traffic, access, atmosphere, electrical exposure, and manual-handling task under the site’s applicable programs. If that assessment has not covered a condition present at the station, stop rather than treating its absence from this guide as permission to proceed.
This article is not operator training or authorization. Only personnel whom the employer has adequately trained and assessed as competent for the exact tool, machine, task, hazards, and precautions may perform or supervise the work; site rules determine any additional authorization. HSE says everyone using work equipment must receive adequate safety training in methods, risks, and precautions. An OSHA record describes a worker with about 2 hr of training whose arm was crushed in a cycling banding machine.
- Strap: confirm the material, width, thickness or grade, lot identification, and approved condition.
- Joint: confirm the specified seal, buckle, clip, or welded-joint program and its compatible strap.
- Tool: confirm the approved tensioner, sealer, cutter, battery tool, or pallet strapping machine.
- Protection: stage the required edge boards, corner protectors, top sheet, anti-slip layer, or other defined interface control.
- Safety: wear the required personal protective equipment and verify guards, emergency stops, work clearance, and isolation procedure.
- Record: have the current packing specification, equipment instruction, and defect/disposition form at the station.
If the approved tool uses a lithium battery, inspect the specified pack, charger, and tool under the manufacturer’s and employer’s procedure before use or charging. OSHA’s advisory bulletin lists impact, crushing, puncture, temperature, and improper charging as damage mechanisms and bulging, cracking, hissing, leaking, rising temperature, or smoke as failure signs. Do not use or charge a suspect pack; clear exposure and follow the site’s battery incident and emergency plan. This guide does not prescribe handling, storage, extinguishing, or disposal of a failing battery.
For a pneumatic tool or station, verify before pressurization that the hose and connections are designed for the specified pressure and service, are in approved condition, and are secured under the site procedure. OSHA 1910.243(b)(2) sets the pressure-and-service suitability requirement; a 2025 serious citation documents possible hose whipping from unsuitable clamps. Do not energize an improvised, damaged, leaking, or moving connection, and keep people out of its possible whip path. Isolate a fault under the approved procedure rather than grabbing the hose.
Hands-clear rule
Keep fingers out from under the strap and outside the tightening path before tool activation. An OSHA accident record describes a fingertip amputation after fingers were placed between plastic strap and a load channel before a battery tool tightened.
Never use packaging strap as a handhold or attachment for pulling, dragging, turning, or repositioning a pallet, crate, or product. An OSHA record describes a worker who used metal bands as handholds to drag a crate; a band broke and the worker stumbled 5 to 6 ft before falling about 4 ft and sustaining multiple fractures. Use the site-approved material-handling method instead; this guide does not select it.
An intact tensioned band can fail without deliberate cutting. Treat its probable recoil or projectile path as an exclusion during application, handling, inspection, and post-release proximity; never place the face, neck, or body in line with the strap or joint. OSHA records a broken band from a falling 23,000 lb steel coil striking and killing a worker. If damage, load movement, lost support, or a questionable joint changes that path, clear the area and use the approved site response rather than approaching to inspect.
Before strap routing or tensioning begins, establish the site-defined exclusion around the active work zone and separate it from concurrent forklift or other load-handling traffic. HSE says loading and unloading areas should be clear of other traffic and unnecessary people. OSHA documents a fatal banding-area event in which a passing forklift toppled 2,300 lb paper rolls in succession. Stop if a vehicle or moving load enters the zone; resume only after site traffic control has restored the separation.
When strapping, inspection, or rework occurs on or beside a trailer, vehicle bed, or loading bay, the vehicle itself must also be prevented from moving under site controls. HSE identifies premature driveaway and trailer creep caused by handling-equipment jolts; either can open a bay gap or displace a ramp. Do not begin or continue until the site’s risk assessment and approved restraint, signal, or work system controls the vehicle, driver, and handling equipment. This guide does not select chocks, restraints, signals, or a dock procedure.
Vehicle restraint does not make standing on a vehicle or load bed safe. HSE specifically includes staff access to a vehicle load bed during loading, unloading, or shifted-load work in its load-security risk guidance and recommends avoiding trailer access where possible. Keep routing or tensioning away from an exposed vehicle, trailer, loading-bay, or dock edge unless the site’s approved work-at-height system covers access, fall prevention, footwear, supervision, and rescue for the task. This guide does not choose those controls.
Stop for an exposed cutter or trapping point, unexpected movement, an unstable or falling load, a jam that could release suddenly, or stored pneumatic or hydraulic energy. When jam clearing could expose a worker to unexpected energization, startup, or stored energy, OSHA 1910.147 treats unjamming as servicing under its scope. Only an authorized employee may proceed under the employer’s applicable energy-control program after all energy sources have been isolated and de-energization verified; manufacturer instructions do not replace that program. OSHA documents a fatal case in which a jammed automatic strapping machine partially cycled while its operator tried to correct the problem.
Never reach through a guard or write an improvised bypass into a pallet-strapping instruction.
Work-area classification creates a separate pre-start stop. HSE warns that electricity can generate hot surfaces or sparks capable of igniting an explosive atmosphere where gases, vapours, mists, aerosols, or dusts exist; its maintenance guidance also identifies static discharge and non-spark-resistant tools as ignition concerns. Do not start manual or powered strapping there until the responsible site authority has assessed the area and approved the tools, materials, controls, and method. This guide neither classifies the area nor establishes equipment suitability.
Conductive steel strapping creates a separate electrical-contact stop. OSHA 1910.333 requires protection from direct and indirect contact near energized equipment or circuits and specifically addresses conductive materials near exposed energized parts. Do not carry, feed, pull, or route steel strap where it or the worker could contact an exposed energized conductor or circuit part. Stop until the responsible site electrical authority has removed or controlled the exposure under the applicable electrical-safety program; this guide supplies no approach distance, de-energization method, or energized-work procedure.
Do not enter an enclosed freight container for strapping, inspection, or rework until the responsible site authority has completed the applicable enclosed- or confined-space assessment and released the space under its safe system of work. HSE RR1178 reports that freight containers can accumulate fumigants, carbon monoxide, other toxic substances, or dangerously low oxygen, with possible asphyxiation or ill health. This risk can exist without an explosive atmosphere. The guide supplies no entry, ventilation, atmospheric-testing, respiratory-protection, or rescue procedure.
Rework and strap removal need their own stored-energy control. OSHA shipyard guidance warns that cutting a tensioned band can make the ends snap toward the cutter or nearby workers. Treat that document as evidence of the snapback mechanism, not as a pallet-specific cutting method. Before cutting, clear nearby people, assess where both ends can travel, and follow the approved removal procedure with the specified eye and hand protection. Keep cut lengths out of floors, aisles, docks, and trailer access paths, then remove them under the site housekeeping procedure.
Before any strap is cut or loosened, verify under the approved removal plan that the product is independently supported and stable and will not expand, uncoil, roll, separate, or lose support as restraint is released. OSHA records one fatal case in which a steel-wire coil came undone when banding was removed and another in which the last of 4 bands was cut on an approximately 3-ton coil. These events establish a product-energy and support check, not a removal method. If the final band carries stability or the load’s releasable energy is unknown, stop and have qualified site personnel secure it under an engineered procedure.
Snapback is not the only removal hazard. An OSHA fatality record reports that cut plastic wrap or bundle strap apparently caught an adjacent two-high pallet and pulled it over. Before cutting or pulling material back, isolate the work from adjacent and tiered loads, control loose lengths so they cannot snag another load, and stop if you cannot establish clearance.
Manual routing can create repeated bending, reaching, and awkward posture, while staging or replacing a supply roll creates a separate lifting task. OSHA’s printing-industry eTool notes that automatic pallet wrapping and automatic strapping can reduce repetitive motion and awkward postures. In one warehouse evaluation, NIOSH documented 100 lb steel-strapping rolls and judged manual lifting of those rolls an unacceptably high injury risk in the evaluated setting. Do not treat 100 lb as a universal threshold: establish the actual roll weight, travel path, handling frequency, and posture before staging or replacement, then use the site-approved handling or feed equipment and ergonomics procedure. A manual strapping task does not authorize a manual roll lift, and automation does not remove the inspection duty.
If compatibility is missing, use the specified strapping for pallets system page for the configuration handoff. A compatible pallet strapping tensioner is only one part of that locked combination.
Polypropylene and polyester strapping can have different elongation and recovery behavior, so do not swap them based on width alone. The approved combination and test record, not the word “securely” on a checklist, must establish the release basis. Ensure the material identity is recorded before tensioning.
Searches for “how to use a pallet bander” or “how to use pallet strapping” still need a work instruction that names the exact system. Shopping labels such as “pallet strapping kit,” “pallet banding strap,” and “pallet strapping tool” describe categories; they do not prove component compatibility.
Prepare the Pallet and Stabilize the Load
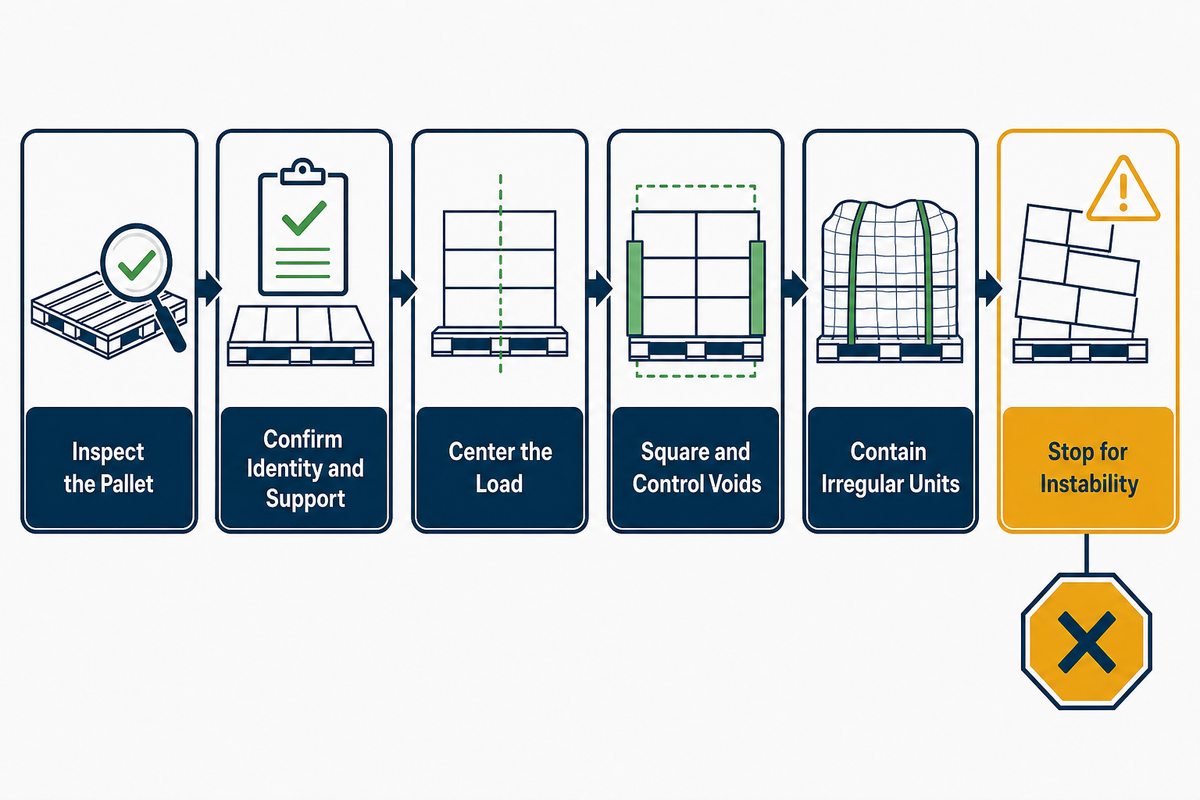
Reject a damaged pallet, then verify that its approved capacity matches the real support and loading condition. Center the product, correct unsupported overhang, control voids, and contain loose units. The objective is an application-safe starting condition that the specified strapping and wrapping method can retain, not a leaning stack forced straight by tension.
Virginia Tech distinguishes rack, floor, fork, conveyor, sling, and other support conditions because each loads the pallet differently. Static floor capacity isn’t automatically rack or dynamic-fork capacity. Confirm the product distribution as well: a flexible uniform load, a rigid line load, and isolated point loads don’t stress the deck in the same way.
Material identity can change the handling risk. HSE PM15 notes that plastic pallets can have slippery surfaces and may be unstable on forklift tines. For a plastic pallet, confirm the specified load-to-deck control, empty-stack condition when relevant, and actual fork interface; don’t assume it handles like a wood pallet.
An unreachable load top is an elevated-access stop, not permission to climb or stand on a pallet. OSHA describes a fatal 7 ft fall from a pallet raised by a forklift and states that pallets are not designed for sitting or standing or for lifting workers. Keep people off pallets and never use a pallet on forks as an improvised work platform. Use only the site-approved access equipment, training, and fall-protection procedure for the task.
- Check deck boards, blocks or stringers, fasteners, fork openings, contamination, and visible deformation.
- Confirm the pallet identity and approved support condition for this load and destination.
- Center the center of mass and keep product within the allowed footprint.
- Square carton columns; block or fill voids only as the packing method permits.
- Contain pails, drums, rigid bundles, or irregular pieces with the fixtures or dunnage named in their specification.
- Stop if a unit can slide, tip, roll, puncture the strap, or block safe material handling.
Illustrative worked example, Carton Line A
This fictional record uses a 48 in × 40 in pallet (1.22 m × 1.02 m), a 1,100 lb load, 30 cartons, a 54 in (1.37 m) finished height, 0 mm approved overhang, a 12 mm polyester strap, 4 corner protectors measuring 914 mm, a 20 min station dwell, an 18.3 m forklift loop, and a recorded room condition of 72°F at 50% RH. These are example fields, not recommended limits or UD Packaging product specifications.
For boxes, inspect column support and top-surface continuity. For pails or drums, control rolling and point contact under the product-specific approved packing and validation method; the preparation cues in this guide do not assign a test method for those containers. For rigid bundles, confirm that the strap can’t migrate off an end. For irregular loads, use a documented fixture or restraint plan; adding a loop around whatever surface is available isn’t a safe solution.
Route the Strap Through the Pallet and Over the Load
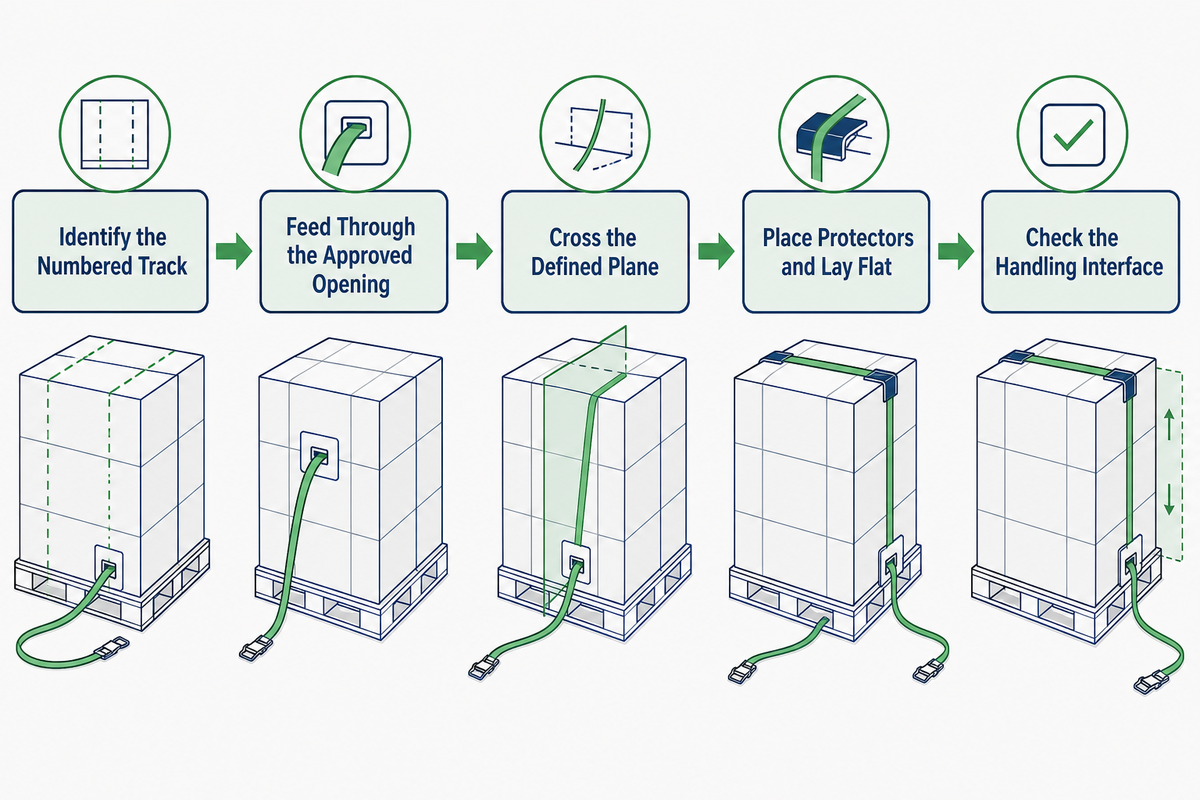
Follow the approved track drawing so each loop engages the pallet and load without crossing a weak deck feature, fork opening, sharp projection, unstable void, or receiver-equipment contact zone. Confirm the complete path while the strap is still loose. There’s no universal route or strap count for every pallet.
ASTM D4675-14a(2022) explains why the drawing matters: load and package type, strap performance, shear planes, component friction, geometry, carrier requirements, regulations, and user testing all influence the application method. The guide is a starting point, not a one-pattern prescription.
No part of this routing step authorizes anyone to stand or pass under a raised portion of a powered industrial truck. OSHA 1910.178(m)(2) applies that prohibition whether the truck is loaded or empty. If the planned path would put a person beneath an elevated truck portion, stop and lower or set the load on the approved stable support under the site’s isolation and material-handling procedure before routing.
- Identify the numbered track on the packing specification.
- Feed or slide the strap through the approved pallet opening without twisting it.
- Bring the strap over the load on the defined plane and keep it clear of labels, closures, and sharp edges.
- Place protectors and confirm that the loop lies flat before joining the ends.
- Check the receiver’s fork, clamp, push-pull, conveyor, or other handling interface before tensioning.
Where ISPM 15 applies, the final path must also leave the required wood-packaging mark visible and legible in use. Annex 2 says the mark should preferably appear on at least two opposite sides. Check only that the strap, protector, wrap, or label has not obscured the compliance function’s accepted mark; this guide does not authenticate the mark or approve the packaging for export.
How to band a pallet by hand?
To band a pallet manually, use the approved hand tools and protective equipment. Feed the specified banding through the designated pallet opening, carry it over the load, fit the required edge protection, and bring the ends into the compatible tensioner and joining tool. Keep hands outside the tightening path. Apply only the validated control or setpoint, make the specified buckle, seal, clip, or weld, cut the tail safely, and inspect the entire loop before moving the pallet.
Don’t substitute a screwdriver, improvised ratchet, metal clip, or cord because a YouTube video appears to demonstrate the motion.
In the Carton Line A record, Track 1 is 8 in (203 mm) from the front reference edge and Track 2 is 8 in (203 mm) from the rear edge. Each 12 mm strap crosses a 914 mm protector, remains 76 mm clear of the label zone, and leaves a 51 mm inspection window around the joint. Those dimensions belong only to the fictional drawing.
Protect Edges and Strap Contact Points
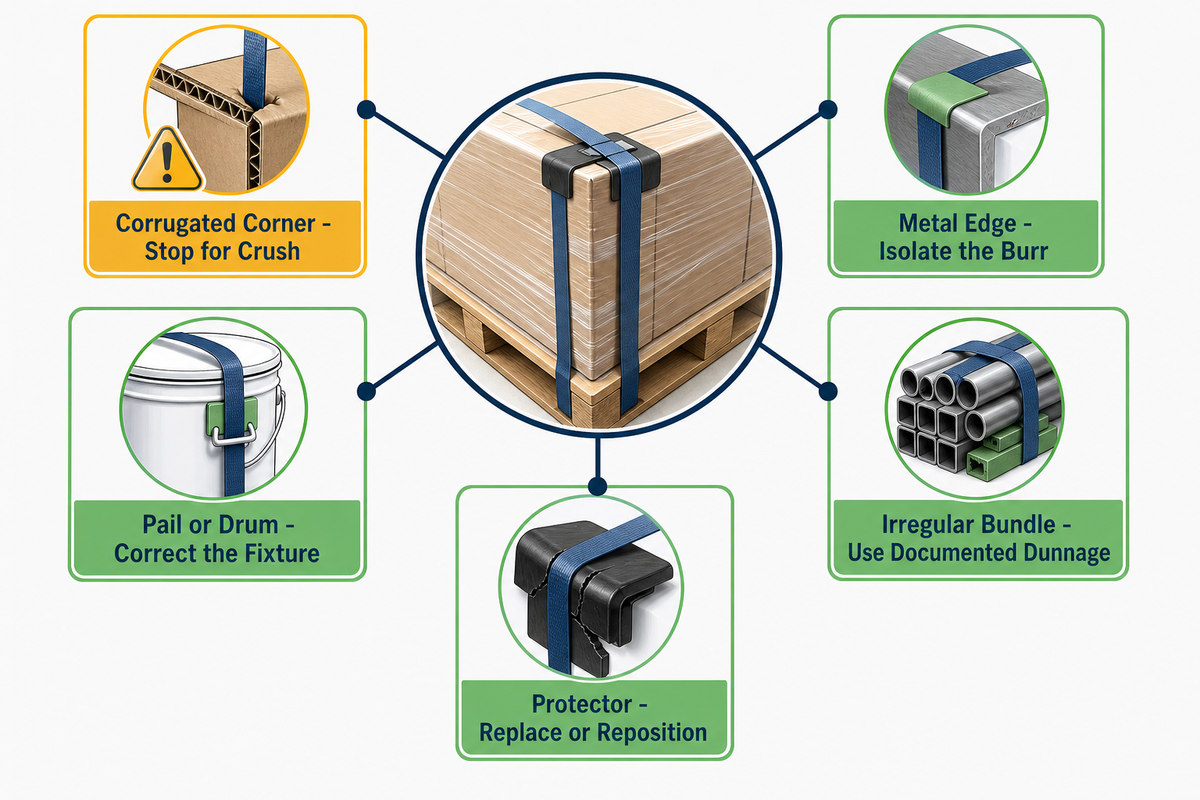
Protect every interface where the strap could cut, abrade, crush, indent, or migrate across the package. The correct protector spreads force and stays in position during tightening and handling. If the contact surface deforms, the protector shifts, or the strap approaches a sharp projection, stop before adding tension.
Protector placement is a hands-clear step of its own, not part of an active tool cycle. Do not place, replace, or reposition an edge protector while a portable tool can activate and tension the strap. Before a hand approaches the protector, put the tool into the employer- and manufacturer-approved non-activatable condition and prevent control operation; stop if that condition is undefined or cannot be verified. An OSHA accident record describes a worker whose fingertip was amputated after a battery strapping tool activated while he was placing an edge protector beneath plastic banding.
| Interface | Watch for | Operator response |
|---|---|---|
| Corrugated corner | Local crush, buckling, torn liner | Stop; verify protector and approved setting |
| Metal or machined edge | Cutting, burr contact, concentrated load | Isolate the edge with the specified guard |
| Pail or drum rim | Migration, rolling, point contact | Correct fixture and path before tension |
| Irregular bundle | Void bridging or strap sliding | Use the documented saddle or dunnage |
| Protector itself | Split, tilt, insufficient bearing area | Replace or reposition; do not tighten through it |
Edge protection does not authorize a tighter setting. It manages an interface inside an already validated configuration. For nonmetallic strap, ASTM D3950 separates material and joint properties; neither property alone proves that a crush-sensitive box can accept the applied compression.
Tension the Strap Without Crushing or Losing Restraint
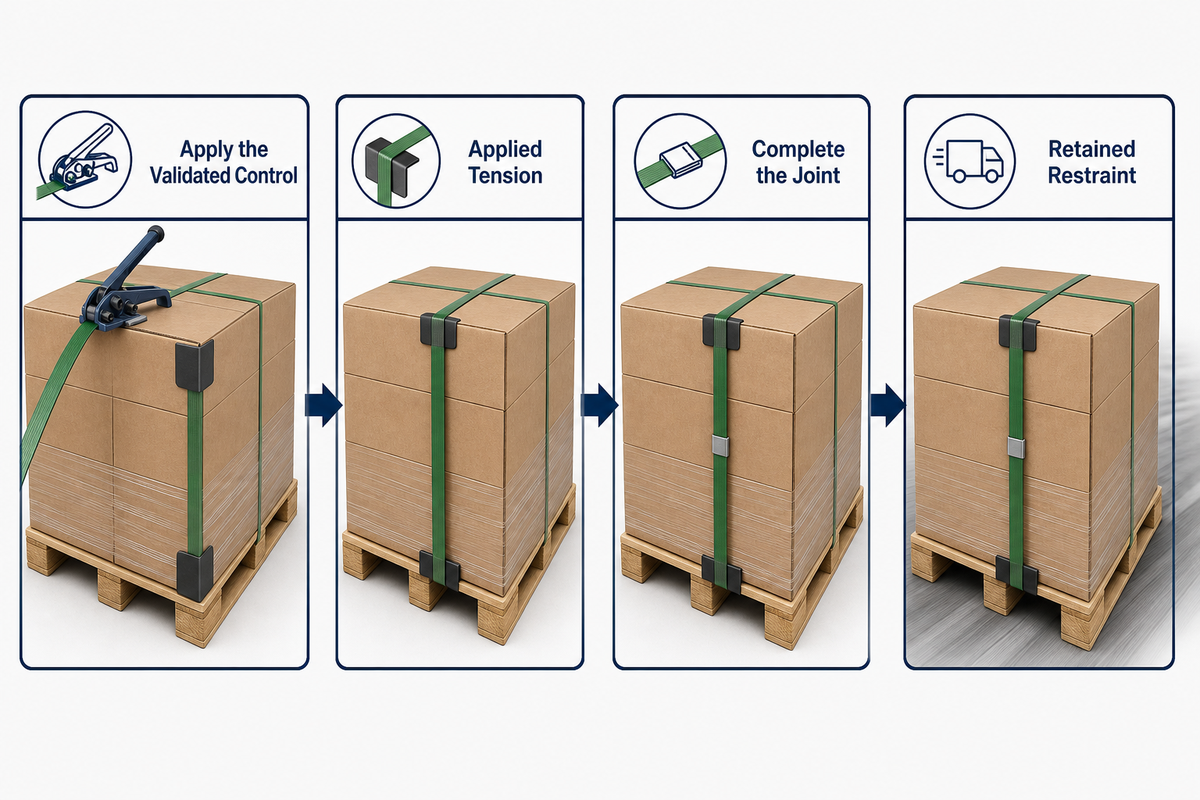
Use the validated tool control for the exact strap, joint, pallet, load, and route. Tension is acceptable only when the strap is seated, protectors remain aligned, the load shows no rejection sign, and the retained condition meets the packing specification. “Feels tight” and “make it tighter” are not acceptance methods.
Applied tension is what the tool creates during the cycle. Retained restraint is what remains after the joint is made and the load settles or moves. Carton compression, protector movement, material relaxation, joint slip, and handling can change the second condition even when the first looked normal.
How to use a pallet strap tensioner?
Place the compatible pallet strap tensioner on the correctly routed, protected strap exactly as its manual shows. Remove slack while keeping the strap flat, keep both hands in the approved grips and outside the loop, then operate the tool to the validated control value or stop condition. Stop for carton crush, protector displacement, strap damage, tool abnormality, or unexpected movement. Complete the matched joint before releasing the tool, then inspect retained restraint.
Watch the load and contact points throughout the cycle. A tool click, torque sound, or display value is not proof by itself.
No universal count or tension
The packing specification may require 2, 3, 4, or another number of loops for a defined application, but this guide supplies no default. That statement applies only to packaging strap used for pallet unitization. It does not override vehicle tiedown rules, carrier requirements, or a tested load plan.
Carton Line A records a 12 mm × 0.7 mm PET strap, Tool Program 17, a 58% machine-display setting, 4 protectors, and 2 tracks. After a 20 min dwell and one 60 ft handling loop, the operator records position and condition rather than converting those example values into a universal tension target.
Do not compensate for a loose result by increasing tension at random. A weak joint, crushed corner, settling stack, incorrect route, damaged strap, or incompatible tool can produce a similar symptom. Diagnose the mechanism first.
Complete and Check the Seal, Buckle, or Welded Joint
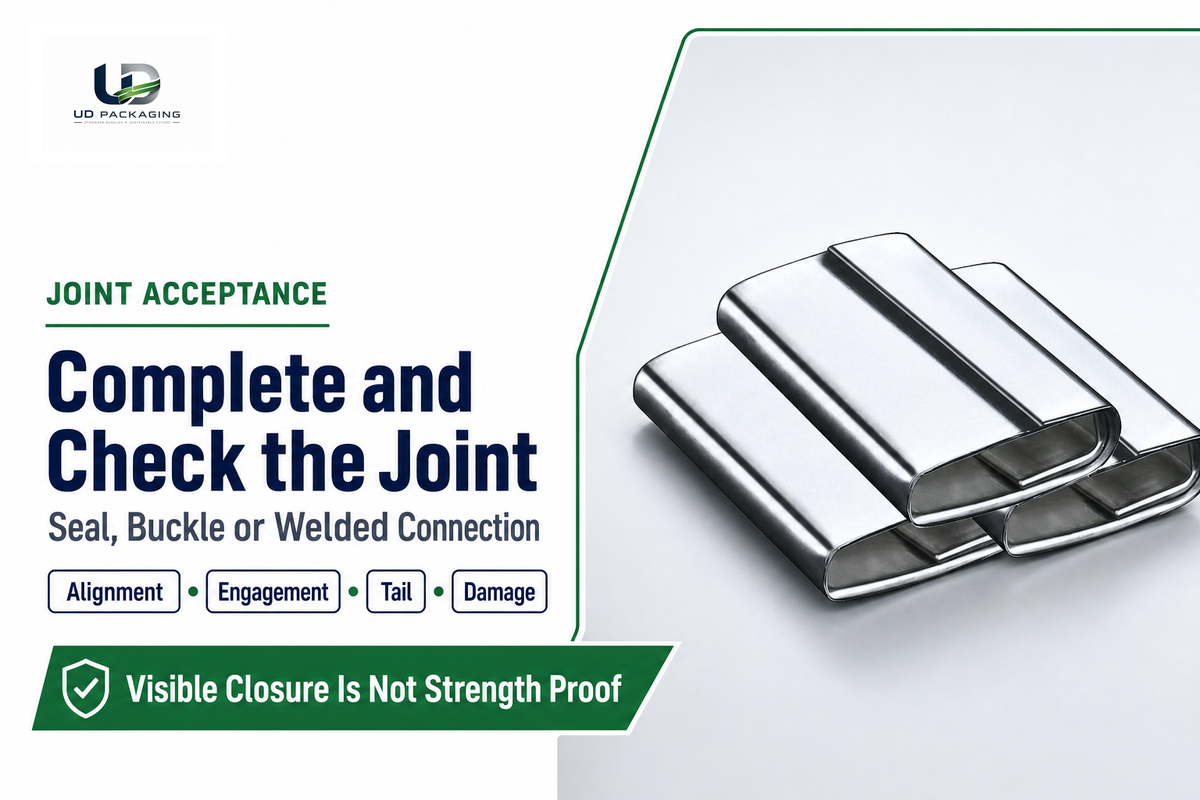
Make only the joint named by the packing specification and tool instructions. Align the strap, joint component, and tool; complete the defined crimp, buckle engagement, or friction weld; cut the tail under control; then check placement, engagement, alignment, tail condition, and visible damage before releasing the loop.
How to use pallet strapping clips?
Use pallet strapping clips only when the specification names the clip and threading pattern for that strap. Thread the ends in the illustrated direction, remove slack, seat the clip squarely, and apply tension with the compatible tool while keeping hands out of the loop.
After joining, confirm that the clip hasn’t tilted, opened, cut the strap, or migrated onto an edge. Reject an incomplete engagement or damaged tail. A visually closed clip doesn’t establish joint efficiency; use the acceptance test and sampling plan defined for the system.
ASTM D3950-23 lists breaking strength, elongation, transverse strength, and joint strength as separate properties for nonmetallic strapping. That separation matters: a strong roll can still have an unacceptable joint, and a neat-looking seal doesn’t prove the assembled loop has passed its required test.
Automatic and semi-automatic strapping machines may feed, retract, tension, seal, and cut in one controlled cycle. US7454877B2 describes torque-controlled functions and allows different loads to require different torque. A cycle-complete signal proves only that the controller reached its programmed state; it doesn’t release the pallet from inspection.
Inspect with the 5-Zone Pallet Release Gate — an Operator Screen, Not a Validation Test
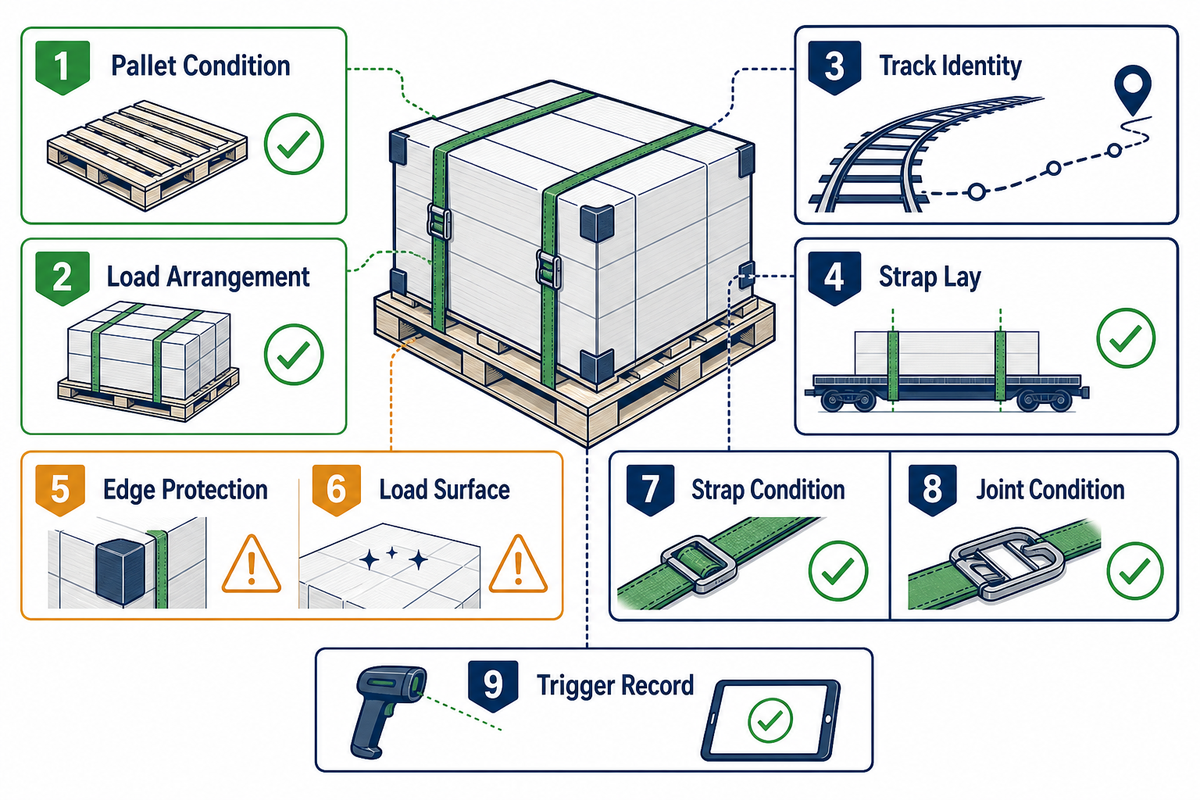
The 5-Zone Pallet Release Gate records nine observable conditions across the pallet/load, route, interfaces, strap/joint, and handling trigger. It supports an internal release, rework, or hold decision under an approved specification. Passing this screen does not certify structural, mechanical-handling, distribution, vehicle-restraint, or regulatory performance.
Method limitation
This named gate was created for this guide as an operator observation record. It is not an industry standard or a substitute for ASTM, ISTA, carrier, customer, engineering, or regulatory testing. “Release” below means release inside the company’s approved process only.
ASTM D6179 uses rough-handling tests to determine unit-load integrity and stability. ASTM D6055 evaluates repeated mechanical handling with actual user-specified equipment. Those scopes explain why a nine-point visual table is useful for defect detection but cannot validate later hazards.
This screen is usable only when the operator has safe access and enough light to observe every required pallet, route, interface, strap, and joint condition. WorkSafe guidance calls for adequate warehouse lighting for safe pallet loading and unloading. A hidden, shadowed, or otherwise unobservable required area is a non-pass: hold the pallet until the area can be made observable or assessed through an approved alternative method.
| Zone / check | Observe and record | Stop or rework signal | Source / basis |
|---|---|---|---|
| 1. Pallet condition | Deck, blocks/stringers, fasteners, fork openings | Crack, separation, obstruction, deformation | Approved pallet record; OSHA stability boundary |
| 2. Load arrangement | Centering, support, overhang, loose units | Lean, unsupported product, rolling or sliding unit | Packing specification; support-condition review |
| 3. Track identity | Correct numbered path and loop count | Missing, added, crossed, or wrong track | Application-specific track drawing |
| 4. Strap lay | Flat strap, clear labels and handling points | Twist, edge contact, blocked fork/clamp zone | Tool instruction; ASTM D4675 variables |
| 5. Edge protection | Position, bearing area, intact protector | Split, tilt, migration, local crush | Approved interface control |
| 6. Load surface | Carton/rim/bundle condition under each contact | Indentation, tear, buckle, puncture | Package acceptance criteria |
| 7. Strap condition | No cut, abrasion, split, abnormal whitening or kink | Any damage or unapproved tail condition | Strap specification and tool instruction |
| 8. Joint condition | Location, alignment, engagement, weld/seal appearance | Open, tilted, cut, slipped, misplaced joint | Joint instruction; sampling/test plan |
| 9. Trigger record | Required dwell, first move, storage or route checkpoint | Undefined trigger or changed condition | Packing specification; handling validation plan |
If the load begins to shift or fall, do not try to catch the cargo or boxes. Clear the exposure area and follow the site’s falling-load emergency procedure. This response boundary comes from a Washington State Department of Labor and Industries pallet-safety tip sheet archived by CDC; it does not replace prevention, exclusion zones, or trained material-handling practice.
Completed banding does not make the potential fall zone safe for tagging, labeling, photography, or close inspection. Before any ancillary post-banding task beside a tall or potentially unstable load, the site’s responsible owner must verify the supported condition and define a method that keeps people outside the possible collapse path; hold the load when that separation cannot be established. An OSHA fatality record describes a 9 ft stack of banded plywood shifting and crushing a worker while he was attaching identification tags.
Handling-point clearance also needs a snag check after the pallet is deposited. A Massachusetts FACE fatality investigation reports that plastic strapping caught a bolt on a forklift mast and the pallet moved backward with the truck. In that incident, the tines were about 6 ft high and the truck backed roughly 2 ft; these describe the event, not operating or clearance limits. At the defined first-move or placement checkpoint, check the loop and tails against the actual mast, carriage, fork, clamp, conveyor, or other interface named in the handling plan. Hold the pallet if a strap can catch, trail, or enter a moving interface; one clear observation does not replace repeated, equipment-specific validation.
Internal strapping release is not authorization to move the pallet with a powered industrial truck. OSHA separately identifies blocked visibility, off-center loads, overloading, and a truck’s specified load-center capacity as handling hazards. The trained operator and site handling plan must approve the actual truck, capacity envelope, load center, sightline, and route before movement; this screen supplies no driving method or movement clearance.
For Carton Line A, the screen records a 1.22 m × 1.02 m pallet, 1.37 m load height, 0 mm overhang, 2 identified tracks, 4 protectors, 12 mm strap, 20 min dwell, and an 18.3 m first-move loop. The clean record permits only the internal disposition defined for this example; it does not prove an 805 km freight route or a different destination.
UD Packaging reports control from PET granulation to finished rolls and SGS product testing. The company’s UD Packaging quality-control approach can support traceability and technical review, but a supplier test does not replace the buyer’s load-specific acceptance and route validation. The user-supplied GB/T 1040.1-2018 reference is not presented as current because the official SAMR record marks that edition abolished.
Reinspect at Defined Handling, Storage, or Dwell Triggers
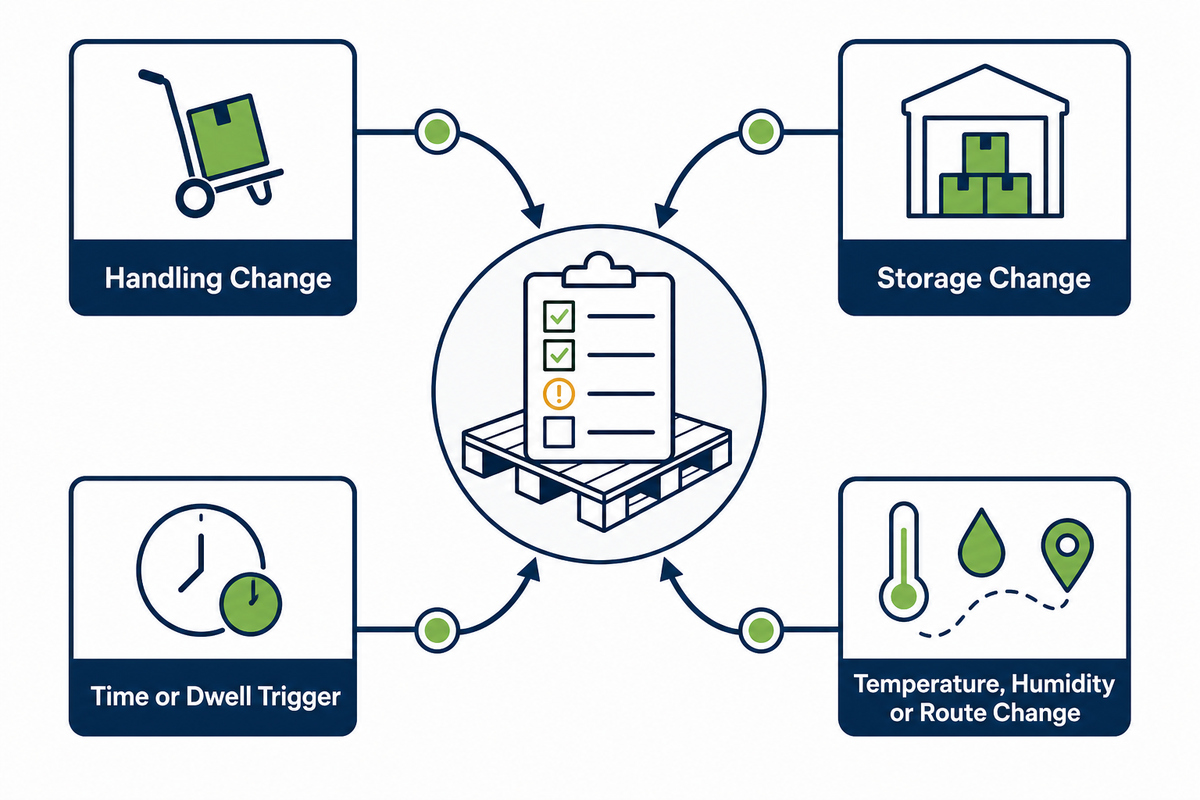
Reinspect whenever the packing specification names a handling, storage, time, temperature, humidity, or route trigger, and whenever an unplanned condition changes. A first move can reveal a defect, but it can’t prove performance through repeated forklift, clamp, conveyor, vibration, impact, or long-duration storage exposure.
ASTM D6055 covers repeated handling with actual user-specified equipment, including fork, clamp, push-pull, spade, grabhook, and sling methods. Its scope expressly excludes individual drums and palletized drums. The D6055 checks discussed here therefore apply only to suitable unitized loads and large cases or crates; pail or drum loads require their own approved validation method, and a D6055 result cannot be used as their validation evidence. For in-scope loads, receiver equipment remains part of the validation question: a pallet that looks stable after one fork move may still be outside the tested condition.
USDA Forest Products Laboratory research ties corrugated safe-load and time-to-failure behavior to load level, storage time, and cyclic humidity. Don’t turn that finding into a generic dwell or humidity threshold. Use it to ask whether the packing specification needs a recheck after environmental change or prolonged staging.
- Compare strap and joint location before and after the defined move.
- Look for carton creep, compression, protector migration, strap abrasion, or a changed loop position.
- Record the equipment used, route segment, storage condition, elapsed time, and observed change.
- Hold the pallet if the trigger wasn’t defined or the condition exceeds the approved window.
At 72°F and 50% RH, Carton Line A is observed at cycle completion, after 20 min, and after an 18.3 m forklift loop with 686 mm fork spacing. If staging changes to 85°F, 75% RH, or 8 hr, the operator doesn’t assume equivalence. The changed condition goes to the owner of the specification.
A loose pallet strap after storage isn’t always a tension problem. The USPS has documented an application where compressible mail loads could loosen strapping during storage or transit. That example isn’t a general replacement rule; it shows why the load mechanism must be diagnosed before re-tensioning.
Read the 9-Symptom Pallet Restraint Failure Map
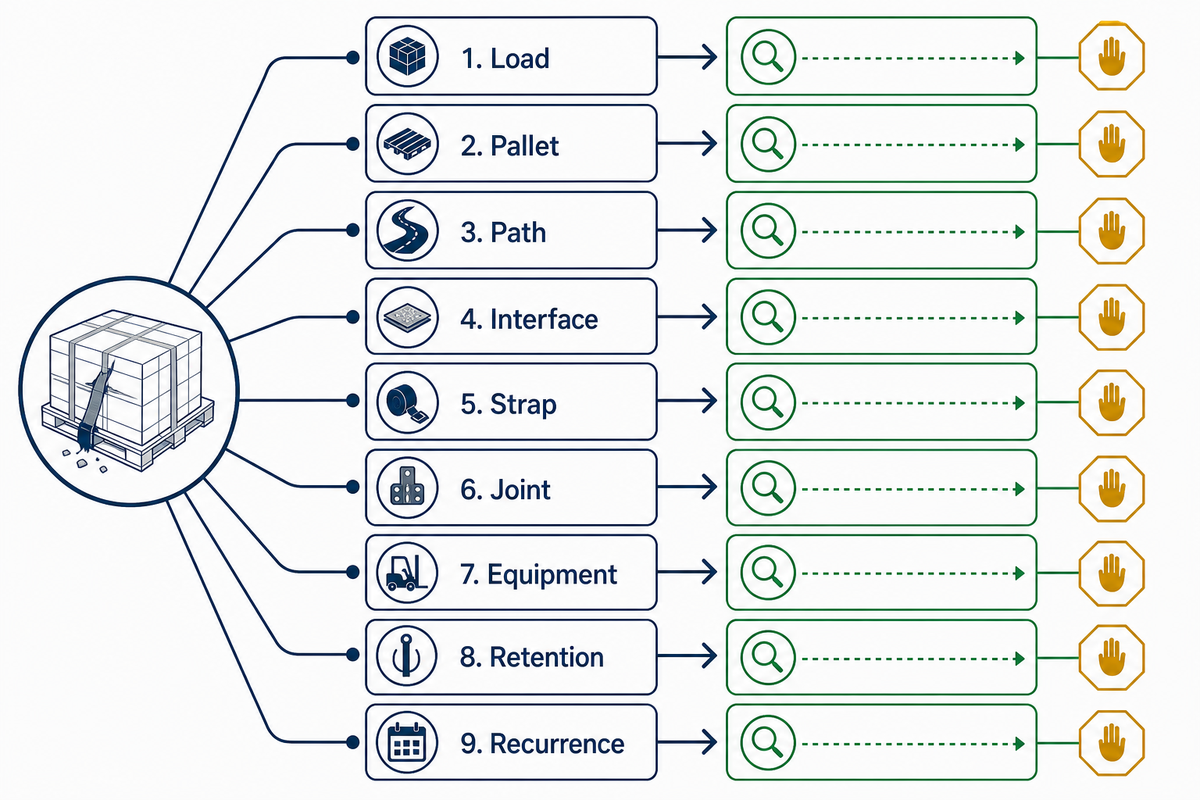
The 9-Symptom Pallet Restraint Failure Map converts an observed defect into possible checks and an immediate safe action. It doesn’t diagnose a universal root cause. Record where and when the symptom appeared, isolate the pallet when needed, and test one bounded hypothesis instead of changing multiple settings at once.
Diagnostic limitation
This map is an operator cue, not an acceptance standard. A photograph or visible symptom alone can’t determine securement adequacy or cause. Each line suggests checks to perform; engineering, maintenance, quality, or the supplier must identify the root cause under the approved change process.
ASTM D4675 categorizes strap properties, tension, package layout, joints, application equipment, testing and failure analysis separately. That framework supports an ordered map: a loose loop, a damaged edge, and an open joint should not all be resolved with tighter tension.
| Symptom type | Observable symptom | Possible mechanisms to check | Immediate safe action | Evidence boundary |
|---|---|---|---|---|
| 1. Load | Stack leans or a unit slides | Base support, void, center of mass, friction, missing fixture | Hold; rebuild or revalidate the arrangement | More tension cannot validate an unstable base |
| 2. Pallet | Deck or block cracks after application | Damage, point load, wrong support mode, contact concentration | Isolate; replace pallet and review load distribution | Visual replacement is not capacity testing |
| 3. Path | Loop migrates or leaves its track | Geometry, sloped surface, twist, protector movement, handling contact | Hold; compare with track drawing and equipment interface | Appearance alone cannot approve a new route |
| 4. Interface | Corner crush or surface indentation | Protector area, package strength, position, excessive setting | Stop; replace damaged package/protector and review setting | Do not add another strap without validation |
| 5. Strap | Cut, split, abrasion, whitening, kink | Sharp edge, worn guide, twist, handling contact, wrong material | Hold; remove safely and inspect the full path | A new roll alone may not remove the cause |
| 6. Joint | Seal opens, buckle tilts, weld peels, tail moves | Compatibility, alignment, wear, contamination, incomplete cycle | Hold; inspect tool and joint process before rework | Visible closure is not joint-strength proof |
| 7. Equipment | Misfeed, jam, variable cut, abnormal sound | Feed path, sensor, blade, guide, air/battery condition, maintenance | Stop and isolate under the equipment procedure | Do not clear an energized jam |
| 8. Retention | Loop is loose after dwell or handling | Load compression, material relaxation, joint slip, protector shift, path change | Hold; compare before/after records and test the mechanism | Loose does not automatically mean low initial tension |
| 9. Recurrence | Same defect returns after bounded rework | Invalid specification, unaddressed variation, changed route or equipment | Stop serial rework; request configuration revalidation | Repeated symptoms raise the decision level |
Record one adjustment at a time. If the joint is open, trace back to the joint process before increasing tension. If the edge is crushed, confirm package protection, strength, and position with the approved control. If the strap is loose only after storage, examine load compression and retained restraint. That order makes the record useful to quality and maintenance instead of concealing the initial defect.
Choose Release, Rework, or Configuration Revalidation
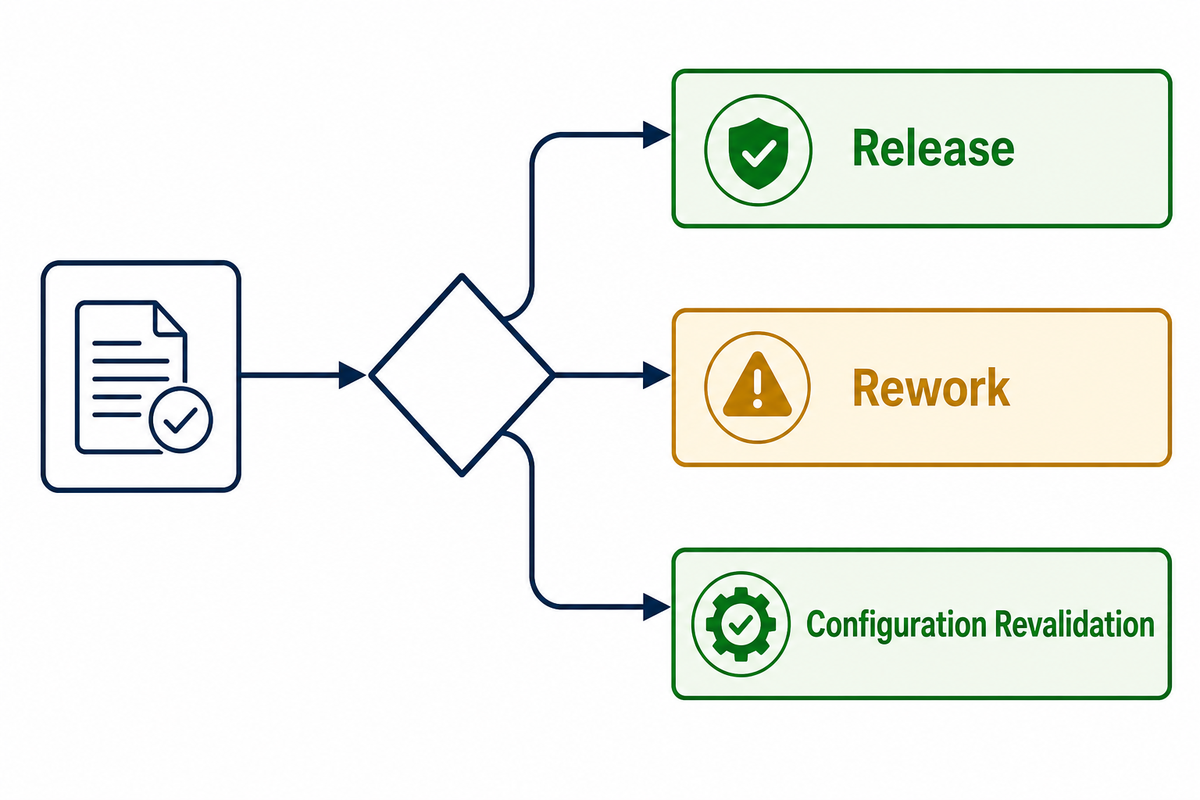
Choose the disposition from evidence, not urgency. Release only when all specified checks pass inside the validated condition. Rework only with an approved instruction that preserves traceability. Revalidate when the configuration is undefined, a critical input changed, the handling route differs, or the same defect returns after bounded rework.
| Internal disposition | Minimum evidence | Do not use when |
|---|---|---|
| Release | Approved specification identified; all required observations and triggers pass; record complete | A required test, route, or regulation is unresolved |
| Rework | Defect is bounded; approved rework method and reinspect step exist | The cause is unknown or rework repeats |
| Configuration revalidation | Technical owner reviews strap, joint, tool, pallet, load, equipment, route, and acceptance evidence | Never bypass it with extra loops or a higher setting |
When a recurring failure reaches the third row, request a configuration revalidation. Send the pallet/load record, strap and joint identity, tool model and program, photos of the full path and defect, timing, handling equipment, environment, and disposition history.
Need a technical review of the complete strapping system?
UD Packaging supplies PET strapping, supporting consumables, and manual, semi-automatic, and automatic equipment. Bring the failed condition and acceptance requirement, not only the load weight, so the team can review the full configuration.
Frequently Asked Questions
The responses address this guide’s operating scope. They don’t replace a packing specification, material-selection review, equipment manual, transport rule, or load-validation plan. If the adjustment modifies a strap, joint, tool, route, pallet, product, or handling equipment, consider it a configuration decision.
What do you need to strap a pallet?
You require a valid pallet, an appropriate load, the accepted strap, its compatible buckle, clip, seal, or weld schedule, the matching sealer and tensioner, any necessary edge protection, PPE, and the current packaging specification. Include the inspection record and defined re-check criterion before work begins. A universal pallet strapping kit alone doesn’t prove the components are compatible. Before work starts, also confirm the receiver’s handling interface and the approved trigger for the first post-movement reinspection.
How tight should pallet straps be?
Use the validated control or measured range for the exact strap, joint, tool, load, pallet, protection, and route. There is no safe universal answer. Stop if the package crushes, a protector moves, the strap is damaged, or the joint changes. After joining, assess retained restraint at the specified dwell or handling trigger. Making a loop tighter can worsen the wrong failure. Record the tool program, joint result, dwell interval, and any change observed after the first handling move.
Can you use ratchet straps on a pallet?
Only when a validated packing or transport plan explicitly specifies that ratchet system for its intended function. Reusable cargo straps, disposable pallet banding, and vehicle tiedowns aren’t interchangeable. Don’t thread a ratchet strap through a pallet because it seems convenient.
Never infer its packaging-loop count from FMCSA vehicle rules.
Can pallet strapping be automated?
Yes. Pallet strapping machines can feed, tension, join, and cut efficiently, which may improve productivity and reduce some manual exposure. Automation still needs controlled load presentation, the correct track, protection placement, compatible materials, joint acceptance, guarding, fault recovery, and post-cycle screening.
A machine’s cycle-complete signal doesn’t prove that the pallet is stable through transportation.
What is the difference between pallet strapping, wrapping, and banding?
Pallet strapping applies discrete tensioned loops. Banding is often used as a synonym, though a project should define the material and function. Wrapping a pallet uses film around the load; stretch wrap can contain lighter loose items and increase surface interaction. Strapping and wrapping may work together.
Neither automatically replaces the other or secures freight to a vehicle.
How do you stabilize a pallet before strapping?
Use an undamaged pallet whose approved capacity matches the support condition. Center and support the load, correct overhang, control voids, and contain pieces that could roll, slide, or shift. Add only the dunnage, top sheet, film, fixture, or protector named by the packing method.
Strapping can help secure the stack, but it can’t make an invalid base safe.
Why We Write This
UD Packaging works across PET strapping, consumables, hand tools, and automated systems. That breadth makes the handoff important: the commercial Page owns material and configuration selection, while this guide owns execution, observation, and escalation. The goal is a repeatable record that shows what happened to the pallet, not a generic claim that one roll or machine fits every load.
Selected References & Sources
Safety and standards links are placed beside the claims they support. The list below collects the foundational sources rather than repeating every claim-adjacent citation.
- OSHA 1910.176, Handling materials, general
- NIST, Metrics for Mixed Pallet Stacking
- ASTM D3950-23, Nonmetallic strapping and joining methods
- ASTM D4675-14a(2022) — Selection and use of flat strapping
- ASTM D6055-96(2019) — Mechanical handling of unitized loads
- ASTM D6179-20(2025) — Rough handling of unitized loads
- WorkSafe New Zealand, Working safely with pallet racking systems
- Virginia Tech, How Much Load Can My Pallet Carry?
- USDA Forest Products Laboratory, Corrugated strength and life criteria
- HSE, Packaging machinery hazards
- OSHA Accident Report 115642.015, Plastic banding tool injury
- OSHA 1910.333, Electrical safety-related work practices
- NIOSH HETA 2005-0318-3006, Manual handling risk evaluation
- FMCSA, Cargo Securement Rules
- HSE, Rated banding and lifting-duty boundary
- PHMSA Interpretation 20-0019, Pallet and straps as overpack
- USPS Federal Register rule, Application-specific palletization and compressible loads
- ISTA, Test procedure overview