Get in touch with UD Packaging Company

At the packing station
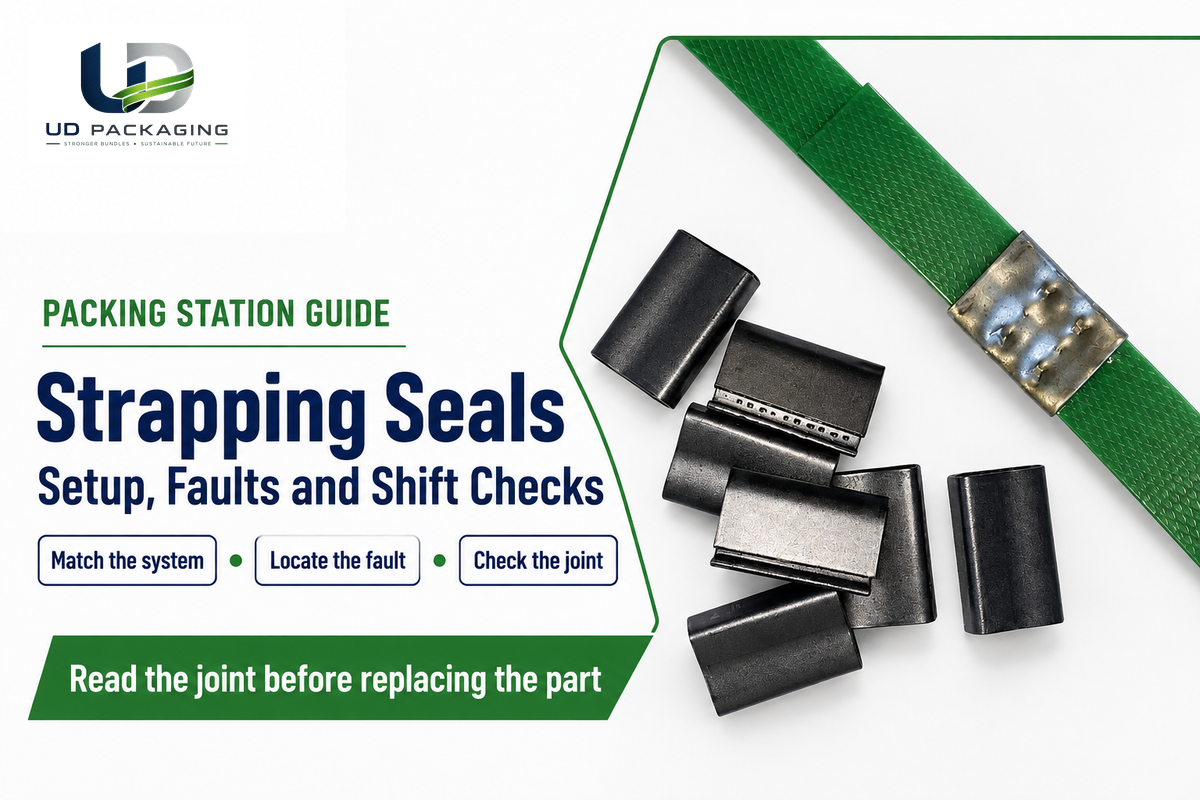
- Identify the strap material, width and thickness before changing a seal.
- Match the seal profile to the named sealer and its jaws.
- Separate movement through the joint from tension lost elsewhere.
- Compare joints at the same elapsed time after strapping.
A band looks tight when it leaves the station, but hangs loose at dispatch. Buying a thicker seal might solve the wrong problem. Strapping seals are part of a system that includes the strap, tensioner, forming tool and package. This guide considers that system and answers the following: what’s the current setup? What’s a repeatable joint? What’s a fault? How is it traced without guesswork from appearance?
Strapping seals join overlapping packaging strap ends when formed with a compatible sealer. Width alone does not establish compatibility. Match material, thickness, seal geometry and tool, then check the completed joint in its intended application.
What Strapping Seals Do at the Joint
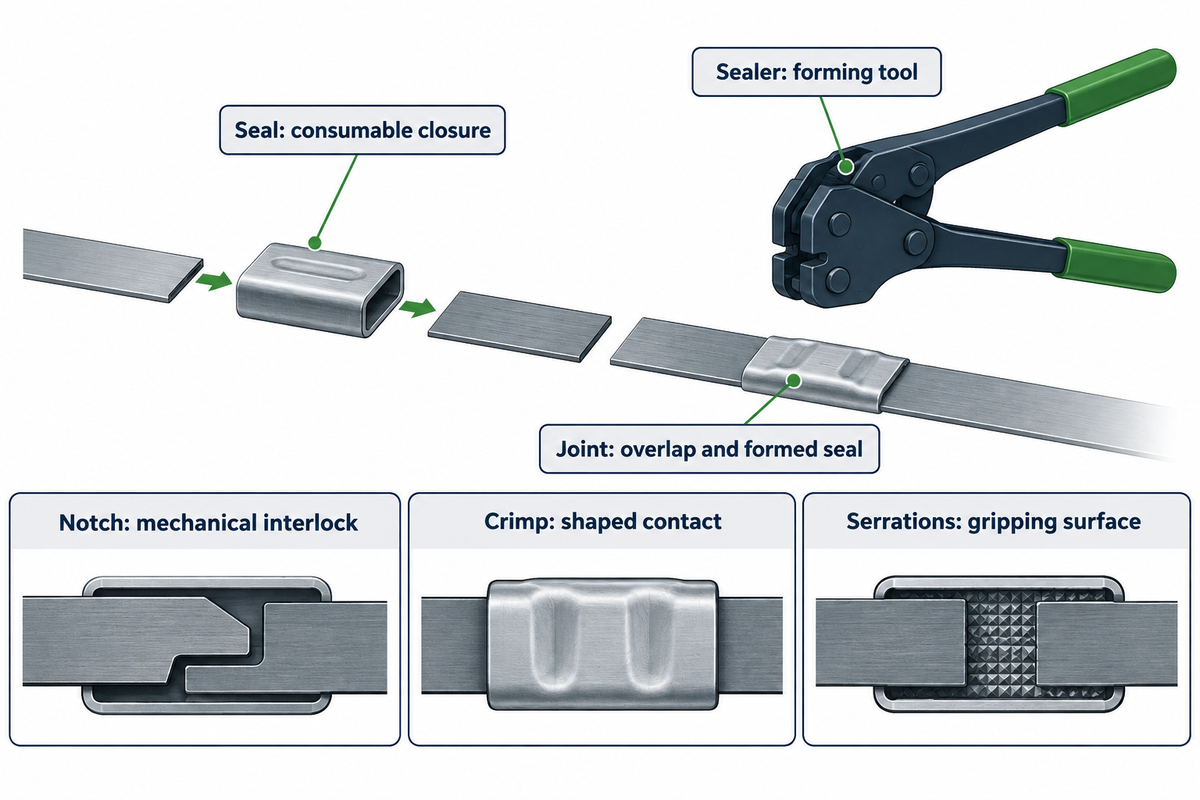
Strapping seals are the consumable closures formed around overlapping strap ends; the sealer is the tool that makes the joint. In a closure, think of the point where the loop transfers force as the joint. The performance of the joint is dependent on the strap and forming geometry, as well as the metal sleeve.
In a notched metal strapping joint, formed tabs interlock. A crimp joint holds through the shaped contact between the seal and strap. Serrations add a gripping surface to specified plastic-strapping systems. The joint design explains why squeezing an unfamiliar replacement until it looks flat is a poor method.
Seals and buckles also route the strap differently. A wire buckle isn’t simply a seal that requires less squeezing. For other broad names and constructions, use our guide to strapping clips and closure types. The checks that follow are initiated by a packing station that has a strap and tool.
Read the Old Seal Before Replacing It
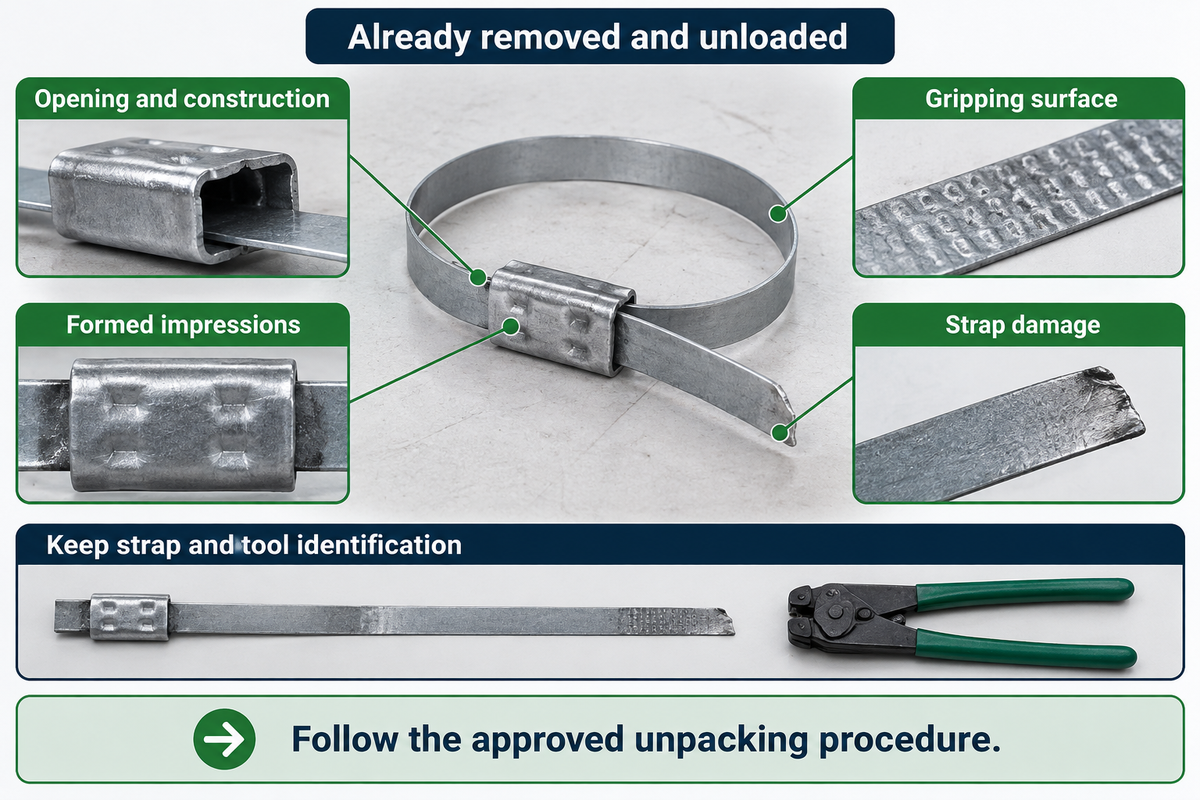
An unloaded, removed seal can help determine the existing joint: look at its opening, gripping surface, formed impressions, and strap damage. Keep the sample with its strap and tool identification. Use samples from the approved unpacking process. Cutting a loaded band to inspect its seal can release stored energy.
The International Marine Contractors Association’s stored-energy incident report describes a coiled-wire-rope package where the remaining retaining strap failed after one was cut. The case concerns that particular package, but serves as a good example to plan for restraint and unloading before handling an old joint. Follow the site’s trained procedures and the equipment instructions.
Write down whether the closure started open or needed threading, and take a picture of the unloaded sample from the top and side. Note the number and position of impressions without treating that count as a universal acceptance rule. Compare a failed sample to a known acceptable sample from the same setup. A bend could be the result of a fault, or could have occurred prior to the fault.
Illustrative changeover: A maintenance technician finds two bins of similar banding seals beside a shared bench. Instead of matching their external width by eye, the technician keeps the labels and checks each part number against the tool manual. If the original part cannot be identified, trial the proposed complete combination under the site’s approval process before releasing production.
Match the Seal, Strap and Sealer as One Setup
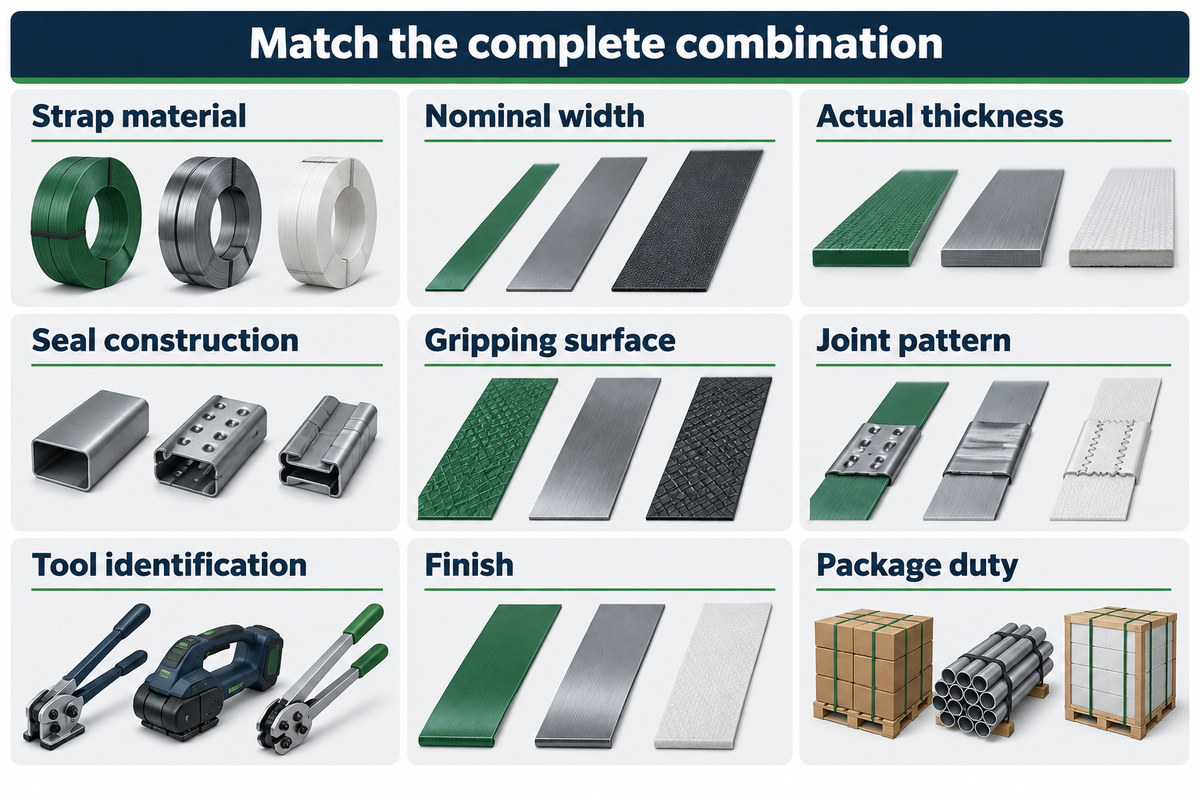
The specified seal and sealer jaw profile should match the strap material, thickness and width. Such a match should also be considered when replacing a consumable or changing a tool. An offending sleeve can still be fitted over the band and still not be a correct match due to the way the jaws form or grip the joint.
Named products make the width problem concrete when matching the seals for steel strap. Signode lists both its C-5823 and SRC-5823 sealers for 16 mm strap, 0.4 to 0.6 mm thick, but identifies double-notch and single-reverse-notch joints respectively. Similar dimensions don’t mean they’re identical in all respects. These examples are from Signode, and not the UD Packaging product specs.
| Check | Record from the current setup | Decision before the change |
|---|---|---|
| Strap material | Steel, PET or polypropylene | Confirm the closure is specified for that material. |
| Nominal width | Width on the strap and seal labels | Match both to the tool range. |
| Actual thickness | Measured strap and supplier tolerance | Check the jaw’s permitted range. |
| Seal construction | Open, thread-on or push-type | Keep the intended feed and placement arrangement. |
| Gripping surface | Plain, serrated or other specified profile | Confirm the compatible forming jaws. |
| Joint pattern | Notch or crimp pattern in the manual | Use the named forming method. |
| Tool identification | Model, jaw set and service condition | Resolve changed or unidentified jaws before use. |
| Finish | Supplier’s exact coating description | Check exposure and contact requirements. |
| Package duty | Support, corners, handling and transit | Evaluate the combination on the intended package. |
Another example is Signode’s 58/34 AMP seal, described for 5/8-inch or 3/4-inch strap with the corresponding tool. The instructions for this product exclude the use of 5/8-inch strap with AMP 1-34 or AM 34 tools. As such, a dual-width seal doesn’t necessarily make a fixed-width tool dual-width.
In the case of plastic strap, FROMM provides serrated PET seals for 12 mm or 16 mm and PP open-flange seals for 12-19 mm with its specified tools. These are separate product ranges. One can’t state that a PET seal is meant to work with all polypropylene bands.
What is poly strapping?
Poly strapping is an informal term for plastic packaging strap. Many sellers use the term more broadly, although it often refers to polypropylene. Read the material designation before choosing the seal. Polypropylene and PET are different materials and the label “poly” doesn’t identify a matching closure, jaw profile or tension setting for either one.
For a replacement order, record the polymer from the roll label in conjunction with the width and measured thickness. If the label is missing, work with your supplier to verify the material rather than relying on color or surface feel. This also keeps a new shift from inheriting an unverified material substitution.
What is the difference between poly strapping and polyester strapping?
Polyester strapping identifies PET in the usual extruded packaging-strap context. “Poly strapping” is a broader term used to encompass polypropylene. The distinction is relevant at the joint. Materials, surface and dimensions must match the joining system specified. A nominal width doesn’t make the seals interchangeable.
When checking a buckle arrangement, keep corded or woven polyester separate from extruded PET. For a move from hand crimpers to a battery friction-weld tool, examine the complete process: strap feed, access under the load, removal, charging and training. A weld removes the separate metal closure in a compatible system; it doesn’t establish a universal strength advantage. Our strapping tools range provides the equipment options to review, once the joint method is defined.
Form the Joint with the Correct Tool Sequence
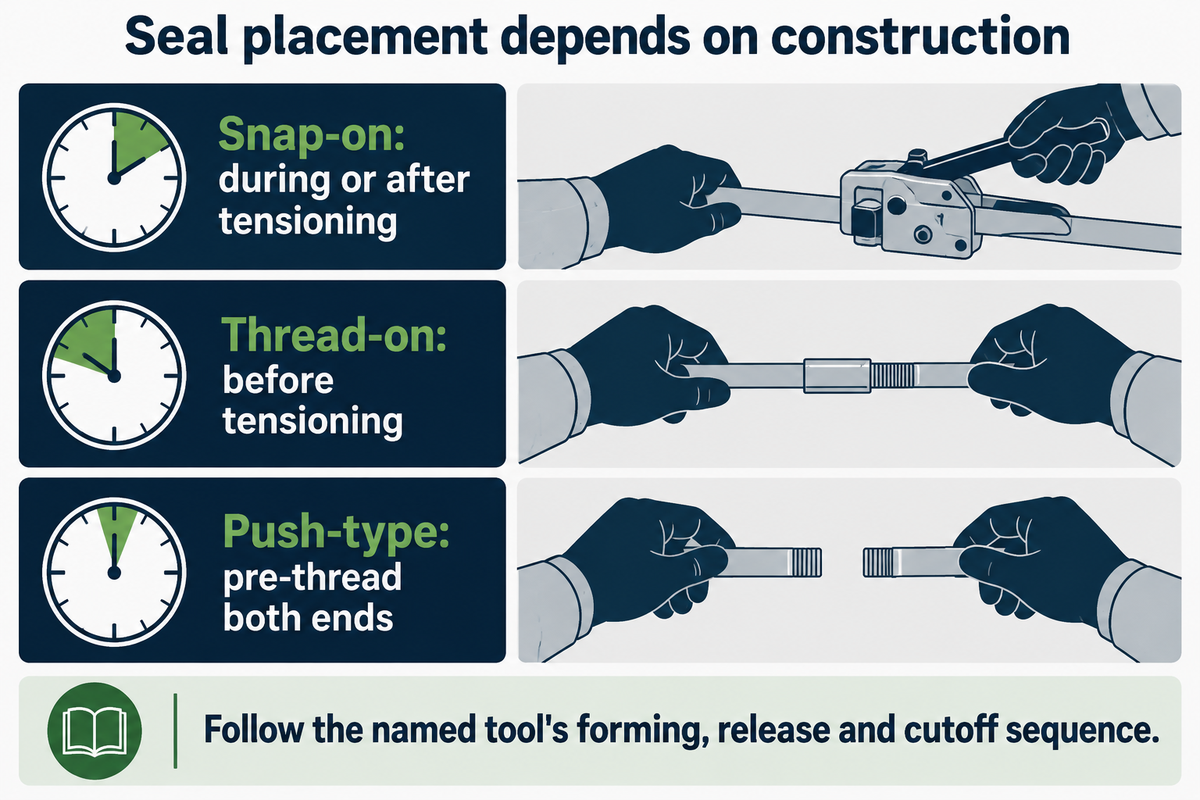
Place and thread the seal according to construction, then follow the identified tool’s tensioning, forming, release and cutoff sequence. Open seals may be applied over the overlap in suitable systems; thread-on and push types require prior threading. The tool manual determines the order and forming actions required for that exact combination.
According to Signode, snap-on seals may be added during or after tensioning, thread-on seals before tensioning, and push-type seals are pre-threaded over both ends for the intended push tensioner. A general instruction “tension first, add any seal, squeeze once”, however, doesn’t reflect these variations.
Even within the same tool family, the number of forming actions can vary. For example, the old Signode B250 manual dated February 1997 specifies 2 crimping actions per seal for 208-DG seals, and 3 actions for 203 seals. The old manual is an example to illustrate the importance of counting actions, which can vary for different parts.
How to tighten steel strapping?
Tighten steel strapping with the tensioner specified for the strap and closure system according to its routing and setting instructions. Place any pre-threaded seal where indicated, join using the compatible sealer, release, and cut in the prescribed order. Don’t evaluate a safe tension from the package weight alone.
Package support and corner contact affect operation. A heavy, irregular bundle can move as tension is applied; a high-tension set up requires its own approved restraint and tool settings. Keep hands clear of the strap path and follow the manufacturer’s protective-equipment instructions. For the tensioning stage itself, refer to the manual strapping tensioner guide.
Diagnose Slipping by Where the Strap Moved
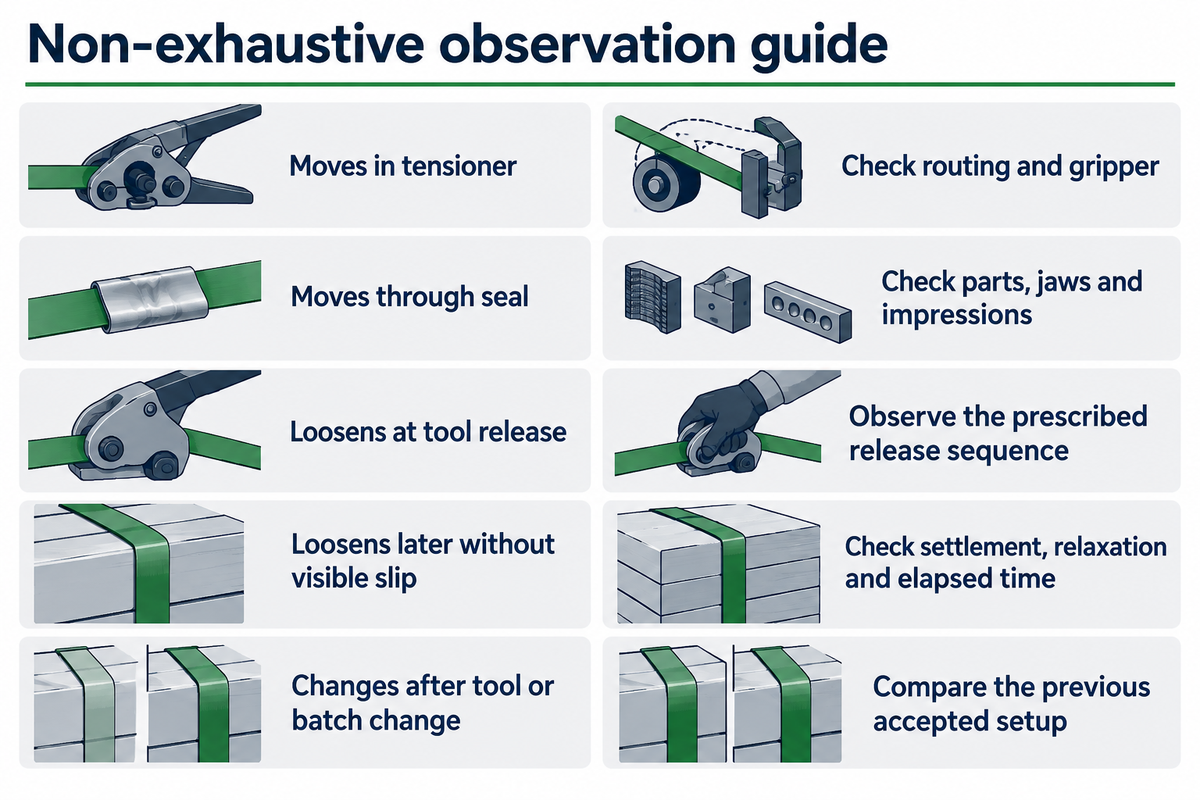
First discern strap movement through the seal from loss of tension elsewhere in the loop. Note when the change occurs: during tensioning, as the tool releases, or later during storage. The observations and the following check can be documented in the Seal-Failure Location Matrix below.
| Observation | Possible interface or mechanism | Next useful check |
|---|---|---|
| Band moves in the tensioner before sealing | Tool grip, strap loading or gripper condition | Check routing and service condition against the manual. |
| Strap ends move relative to each other inside the formed seal | Seal grip, forming geometry or incompatible components | Compare part IDs, jaws and completed impressions. |
| Loop loosens when the tool releases | Joint movement or change during release | Observe release in a controlled trial; check the prescribed sequence. |
| Loop loosens later without visible interlayer movement | Package settlement or material stress relaxation | Record package dimensions and elapsed time after strapping. |
| Strap is cut within the joint | Local forming damage or an incompatible setup | Retain an unloaded sample; compare jaws and strap condition. |
| Damage starts near a seal edge | Local contact, edge condition or existing strap damage | Inspect both contact surfaces and unused material. |
| Strap breaks away from the seal | Strap damage, package contact or loading conditions | Inspect the break location and handling history. |
| Seal opens or cracks | Closure condition, forming mismatch or application loading | Hold affected work for the site’s disposition; preserve the parts. |
| Formation changes after a tool or batch change | Changed component dimensions, jaw condition or setup | Compare the last accepted combination with the replacement. |
Relative movement of the two ends of the strap can be traced if approved to do so safely. Loose band by itself can’t identify the interface that moved. Troubleshooting for a manual steel tool also accounts for a slipped tensioner gripper and a failed sealed joint as separate situations.
The stress held by the material at a given extension can decrease over time. Vas and Nagy’s 2006 polypropylene research analyses this stress-relaxation behaviour in PP specimens. Compare the tension in various specimens at the same elapsed time after application before attributing a difference to the method used in a different shift. That comparison must precede attributing a difference to the sealing technique used in a different shift.
Illustrative Dispatch check: A warehouse supervisor observes loose loops on a settling carton stack, while the strap ends show no visible relative shift through the seals. The next step involves checking the change in package height and time since strapping. Increasing the tension or replacing each of the seals without that comparison could result in the same problem at dispatch.
Investigate Cut Strap, Splits and Cracked Seals
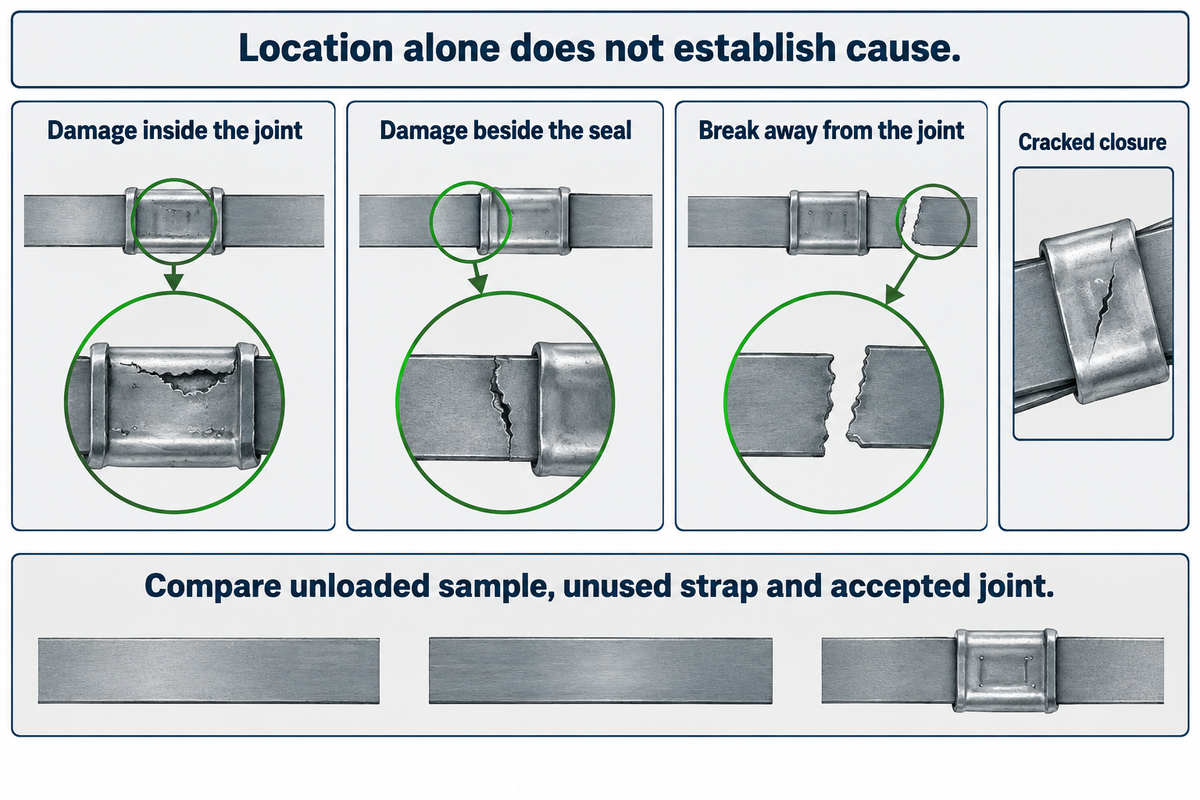
Retain the site and appearance of the damage prior to selecting a remedy. Strap cut inside the seal, split beside it or broken against a package corner requires a different comparison in each case. Check an already unloaded failed sample against unused strap and an accepted joint from the same setup; damage location alone does not indicate the cause of failure.
A routine maintenance check should include the specified jaw profile, alignment, wear and contact surfaces. Follow the service instructions of the tool rather than reshaping the jaws to remove an unwanted mark: the intended formed pattern is part of the gripping mechanism. Increasing the thickness of a seal, without checking the fit and the application load, is a guess.
Illustrative PET fault: following a sealer change, an operator notices lengthwise splits beside the closure. Hold the affected work under the site’s quality procedure and compare the jaw set, seal part and unused band with the previously accepted setup. Broader material and feed issues are addressed in PET packing strap troubleshooting. This section doesn’t specify a crack size limit or approve a damaged joint for dispatch.
Check Joint Consistency Across the Shift
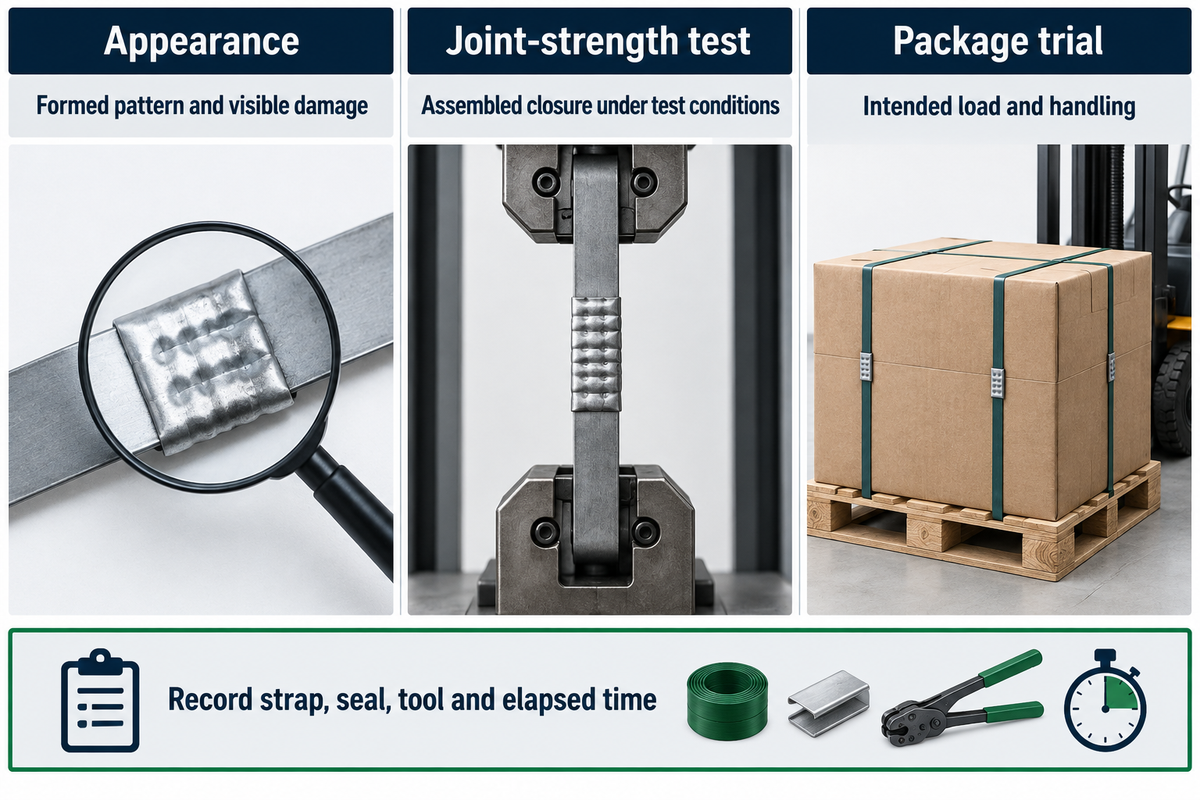
Compare joint formation after setup changes, material changes and tool service, using the site’s approved inspection and sampling plan. Keep the strap, seal and tool identities with the result. Record the time after strapping and the shift, so an older relaxed loop is not compared directly with a freshly tensioned one.
Separate the checks by what they answer. Appearance records the formed pattern and visible damage. A joint-strength test measures the assembled closure under the test conditions. A package trial examines the intended load and handling conditions. A good looking seal or strap tensile certificate can’t replace the other parts of that evaluation.
ASTM D4675-14a (2022), A guide for selecting and using flat strapping, gives the rationale to test the intended combination rather than to rely on a generic guide. In its public scope, it does not provide application-specific instructions and states:
“Thorough user testing is essential.”
Use the accompanying document for the material: ASTM D3953-15(2022) covers flat carbon-steel strapping and seals; ASTM D3950-23 covers nonmetallic strapping and joining methods.
Keep the material and closure batch, tool model and jaw set, setup instructions, observed faults, the test method and result for each comparison. If only the seal changes, keep the other trial conditions consistent where practical. If several parts change together, the result evaluates that new combination and does not isolate which change caused it. Details of the measurements are provided in our joint strength testing guide.
A purchasing team may question the need for a repeat test, if the nominal size hasn’t changed. Point to the changed closure or material part and tool jaw, and compare the combination under the agreed acceptance criteria. This guide doesn’t give lifting or load rating approval, or compliance with transport regulations.
Count the Cost of Rework Before Reordering
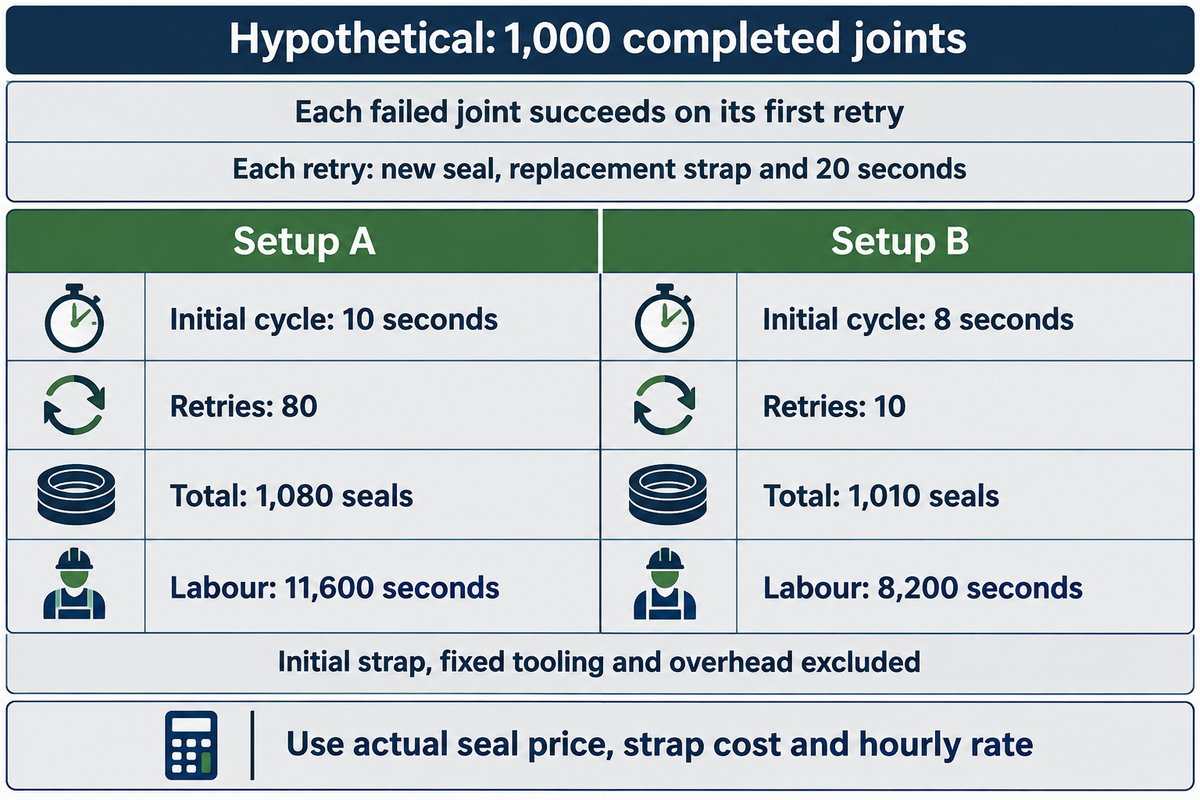
Compare seal consumption, labor and retries over the same scope for the first 1,000 joints before choosing a lower unit price. Below is an example that uses estimated work times and retry counts, and prices taken from your records. It uses estimated times and assumes every retry is successful, yielding 1,000 joints, and doesn’t account for variation in the time it takes to perform a work step.
Hypothetical work inputs: setup A takes 10 seconds per initial joint and needs 80 retries; setup B takes 8 seconds and needs 10 retries. Each retry uses one new seal, one replacement strap length and 20 seconds of labour. In both setups, a common initial strap, fixed tooling and overhead are excluded. Neither setup represents a particular supplier’s product.
| Quantity within the stated scope | Setup A | Setup B |
|---|---|---|
| Total seals, including retries | 1,000 + 80 = 1,080 seals | 1,000 + 10 = 1,010 seals |
| Initial and retry labour | 1,000 × 10 + 80 × 20 = 11,600 seconds | 1,000 × 8 + 10 × 20 = 8,200 seconds |
| Total labour hours, rounded | 11,600 ÷ 3,600 = 3.222 hours | 8,200 ÷ 3,600 = 2.278 hours |
| Replacement strap lengths | 80 lengths | 10 lengths |
Multiply the actual seal unit price by the seal quantity, replacement lengths by their actual material cost, and labour hours by the same hourly rate. Sum the total costs for each setup. In this example, B uses 70 fewer seals and 3,400 fewer seconds, but its total cost still depends on the actual prices.
Real numbers from your observations need to be used to determine cycle times and retries. For one retry, count the material and labor once, unless it was already included in your recorded retry cost, in which case don’t include it again. Change your calculations if the type of seal, strap, tool or handling is changed.
Keep approved part numbers on the order to help prevent an unnoticed substitution. Check stock, batch traceability and the intended use to secure the package before placing the order. At UD Packaging, we supply strapping consumables and equipment. Bring your current strap and tool details to our strapping seals and matching system options page when you’re ready to discuss a replacement.
FAQ: Strapping Seals
What are strapping seals?
They are consumable closures for overlapping strap ends.
A compatible sealing tool forms the metal around the overlap to make the joint. The required seal depends on the strap material, dimensions, tool and application. Keep the closure and sealer identities separate when reordering: one is the part used on each band, while the other is the equipment that forms it.
What are the different types of packing seals?
For strapping, common descriptions include open, thread-on and push-type.
Serrated describes a gripping surface rather than a separate material family. Supplier terminology varies, so check the drawing and specified strap-and-tool combination rather than relying on a name alone. The required placement order also changes with construction. Other uses of packing seals, such as gaskets or tamper closures, fall outside this packaging-strap guide.
Which strapping seals do I need?
Start with the strap and tool already in service.
Compare the material, nominal width, actual thickness, seal style and sealer jaw profile against the supplier instructions. Confirm the complete combination whenever a component changes. A seal that fits over the band isn’t necessarily the correct replacement. Keep the previous part label and an unloaded accepted sample available for the comparison.
Can strapping seals be repaired?
Replace a damaged formed seal through the approved rework procedure.
Re-forming it or squeezing it again doesn’t restore an established original joint performance. Follow the closure and tool instructions for replacement, including restraint and unloading of the package. Don’t cut a loaded band simply to recover the damaged closure.
How do I choose between open, push-type and thread-on seals?
Choose the construction specified for the actual tool and threading arrangement.
An open seal can be placed over an overlap in a suitable system, while thread-on constructions require earlier threading. Push-type systems use their intended tensioning arrangement. Compare the drawing, strap range and operating manual, then evaluate a representative joint under your approval process. Preserve the approved part number in the packing-station instructions so the next shift can repeat the setup.
How are strapping seals used?
Position, tension and form the joint in the identified tool’s prescribed order.
Threading, cutoff and tool release vary with the specific system. Apply the seal with the compatible sealer and inspect the completed joint under the approved procedure. Follow the manual’s forming pattern and operations rather than adopting a universal crimp count.
How do I choose between galvanized and standard finishes for seals?
Confirm the supplier’s exact finish designation and the intended exposure.
Moisture, outdoor storage and contact with the packaged product affect the selection. “Standard” isn’t a universal coating specification. Keep the correct strap-and-tool match while comparing material and finish details, then assess the combination under the application’s conditions. Describe whether the packs stay in dry indoor storage, face condensation, or wait outdoors before transit. Include contact with the product and any wrapping that could retain moisture. Ask the supplier to compare the specified finishes for that exposure, and record the approved finish on the order so an available substitute doesn’t silently change what arrives at the packing station.
Named manufacturer examples retain their original ownership. Follow the current instructions and approved application tests for the equipment in use; no universal tension setting or joint efficiency percentage is assigned here.
References & Sources
- Stored energy, injury sustained whilst removing metal straps International Marine Contractors Association, Safety Flash 17/08.
- Relationship between the tensile and stress relaxation behaviour of polypropylene László M. Vas and Péter Nagy, Periodica Polytechnica Mechanical Engineering, 2006; university-hosted research abstract.
- D4675-14a(2022): Standard Guide for Selection and Use of Flat Strapping Materials ASTM International, public scope.
- D3953-15(2022): Standard Specification for Strapping, Flat Steel and Seals ASTM International, public scope.
- D3950-23: Standard Specification for Strapping, Nonmetallic (and Joining Methods) ASTM International, public scope.