Get in touch with UD Packaging Company

Strapping Buckles Guide for Types, Fit and Use

By Cherry · Updated October 2026
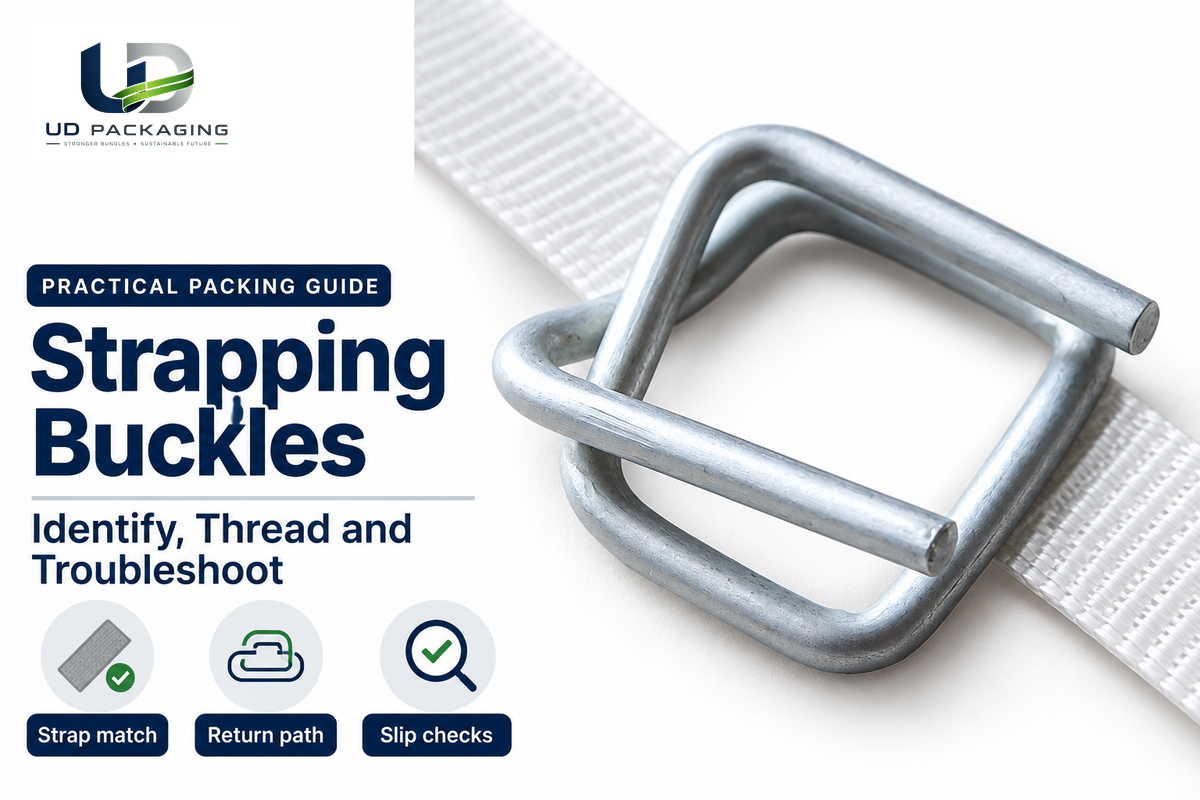
Strapping Buckles join packaging strap by returning it around buckle legs or bars so the matched parts grip under tension.
Plastic and wire designs take different paths. Choose the buckle for the strap construction, width and application method, then check the completed joint before the package moves.
Start with the strap, then identify the buckle. A flat polypropylene band, woven polyester cord and flat extruded polyester strap can require different closures, even when their nominal widths match.
A buckle that looks familiar could still be the incorrect part for the band on your packing bench. The useful questions are practical: where do the loops locate, which end moves during tightening, and did the tail actually move when the strap became loose? This guide takes you through those questions to identify, thread, and troubleshoot buckles. For product configuration and supply, use our dedicated strapping buckles page.
How Strapping Buckles Grip the Strap
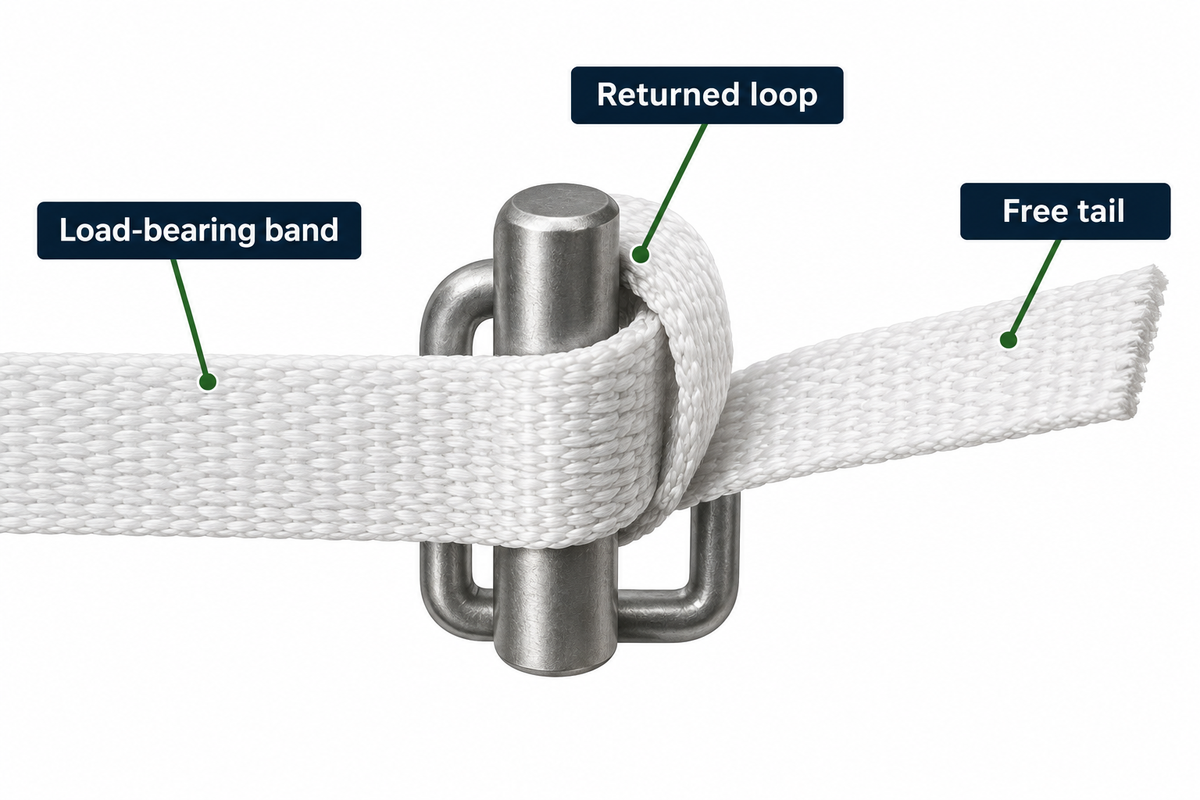
A strapping buckle functions by making the strap double back through a specified contact path. The strap layers bear against the buckle and each other as tension develops. Grip therefore comes from the assembled strap, buckle geometry and threading, rather than from the metal or plastic part alone. A missed return changes the strap path.
In a wire buckle, loops engage the projecting legs or tines. A folded plastic design folds its legs into loops passed through the center. Routing strapping through buckle openings without completing the return can result in a piece that looks connected but pulls through during tightening. Follow the illustrated path for the part in your hand.
- Load-bearing band: the section wrapped around the package.
- Returned loop: the fold around a leg or bar.
- Free tail: the final part used to form or modify the connection.
Contact friction and geometry also matter beyond the buckle. ASTM D4675-14a(2022), section 4.1 includes both when describing strapping evaluation during handling, transit and storage. Correct threading helps form a secure attachment, while package evaluation also considers movement during distribution.
Plastic and Wire Buckles for Packaging
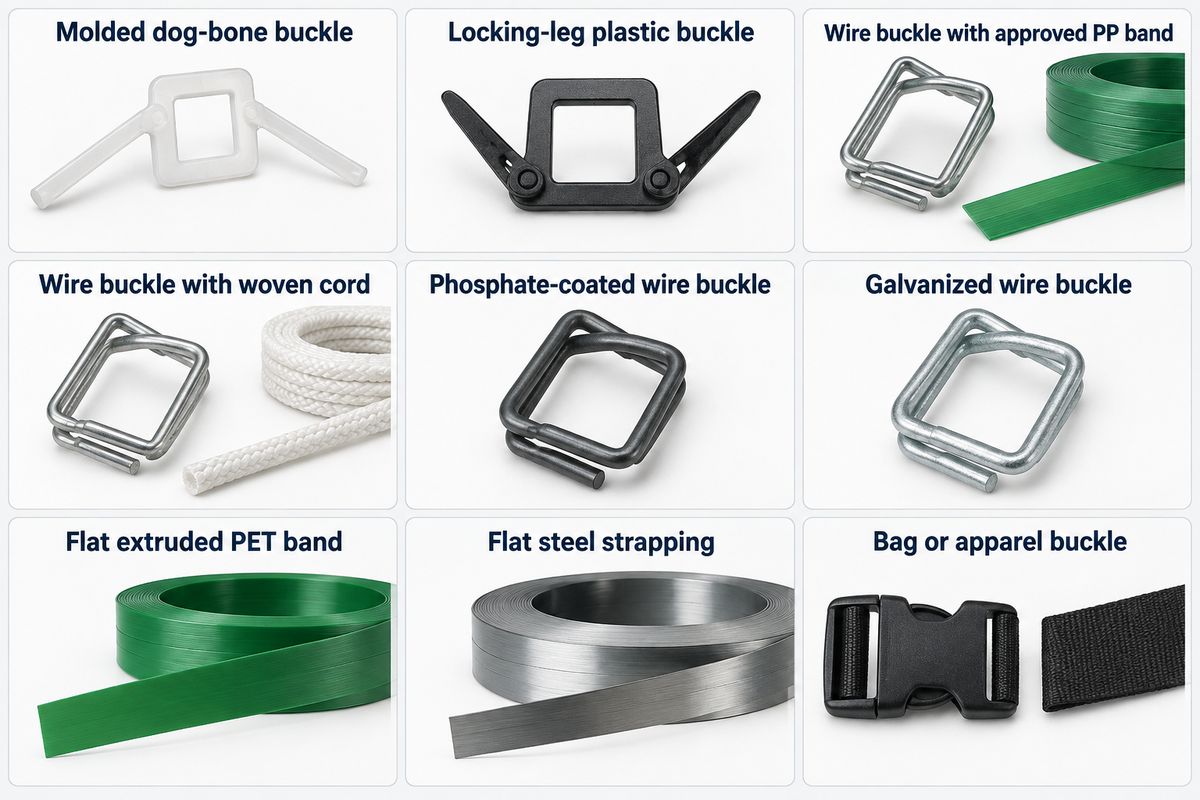
Plastic buckles are commonly used with matched hand-applied polypropylene systems. Specified wire buckles are used with polypropylene and multiple polyester cord constructions. Flat extruded polyester is a different case. Identify the strap structure prior to closing: The term “polyester” describes a family of materials, not a closure interface. Appearance alone is an unreliable identification method.
Buckles for poly strapping serve different bands. Examine for a solid, flat band, a visible woven fiber structure or a composite cord band where fibers are held together by a covering. At the contact points, weave and a smooth extrusion behave differently. Roll label and construction give useful information.
| What you have | Strap or closure clue | Next action |
|---|---|---|
| Molded dog-bone buckle | Folding legs and a central opening | Use the matched PP strap and two-loop folding method. |
| Locking-leg plastic buckle | Legs retain a pre-threaded arrangement | Keep its own threading sequence; a similar plastic shape may differ. |
| Wire buckle with approved PP band | Supplier lists hand-grade polypropylene | Use that specified combination; wire is not automatically excluded for PP. |
| Wire buckle with woven cord | Visible polyester fiber weave | Match the cord grade, width and designated buckle. |
| Phosphate-coated wire buckle | Rougher contact surface in a specified cord system | Retain the specified finish when reordering. |
| Galvanized wire buckle | A specified composite-cord pairing | Match the actual cord and buckle grade, rather than the silver color. |
| Flat extruded PET band | Solid polyester band rather than cord | Use its specified seal, weld or purpose-designed buckle system. |
| Flat steel strapping | Steel band with its own closure equipment | Keep the steel closure route separate from poly wire buckles. |
| Bag or apparel buckle | Side-release or ladder-lock webbing hardware | Keep it out of an industrial packaging-buckle substitution. |
These cases of identification include different strap structures and look-alike closures. They are not nine interchangeable buckle types. ASTM D3950-23 treats nonmetallic strapping together with joining methods. For the wider vocabulary of seals and clips, see strapping clips and closure types; our plastic and metal closure comparison covers the separate buying decision.
Buckle Size, Wire Diameter and Surface Finish
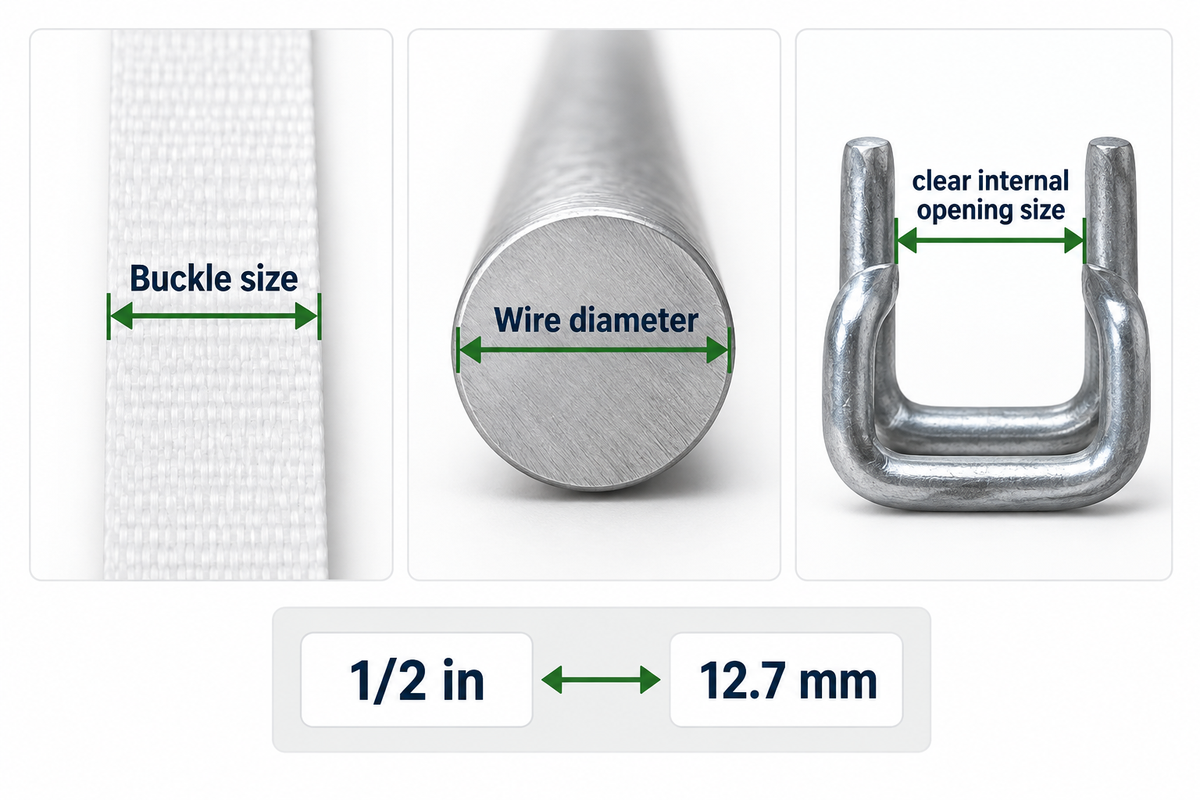
Wire diameter describes the wire forming the buckle. Buckle size typically identifies the intended strap width. Neither is the same as clear internal opening size. Read all three dimensions separately, and retain the specified surface finish. A buckle design with a stronger-looking wire section or a nominal width is not necessarily interchangeable with another design.
Inches need to be taken into consideration carefully. Half an inch is exactly 12.7 mm, whereas a product sold under a rounded metric name can have its own dimensional tolerances. The NIST conversion factors distinguish conversion factors from the precision of a measured value. Converting a unit in a measure does not introduce a manufacturing tolerance.
| Inch width | Exact metric conversion |
|---|---|
| 3/8 in | 9.525 mm |
| 1/2 in | 12.7 mm |
| 5/8 in | 15.875 mm |
| 3/4 in | 19.05 mm |
| 1 in | 25.4 mm |
| 1 1/4 in | 31.75 mm |
| 1 1/2 in | 38.1 mm |
Read the finish of the product as part of the specification. Surface treatments such as a zinc coating and phosphate treatment may result in different surfaces. A bright surface may not be an approved strap pairing. For outdoor exposure, use the specified corrosion-resistant product rather than treating “galvanized” as a promise of indefinite life.
3-View Buckle Threading Check
Follow the path of the loops of the strap section, contact and tail exit before pulling the joint tight. Follow both loops from the top view, without a twist. From the side view, look for the contact around each leg. For tail and exit clearance, keep the free (unloaded) tail separate from the loaded (constrained) band. This is an observation method for threading, not for assessing the strength of the assembly.
How to Thread a Packaging Buckle
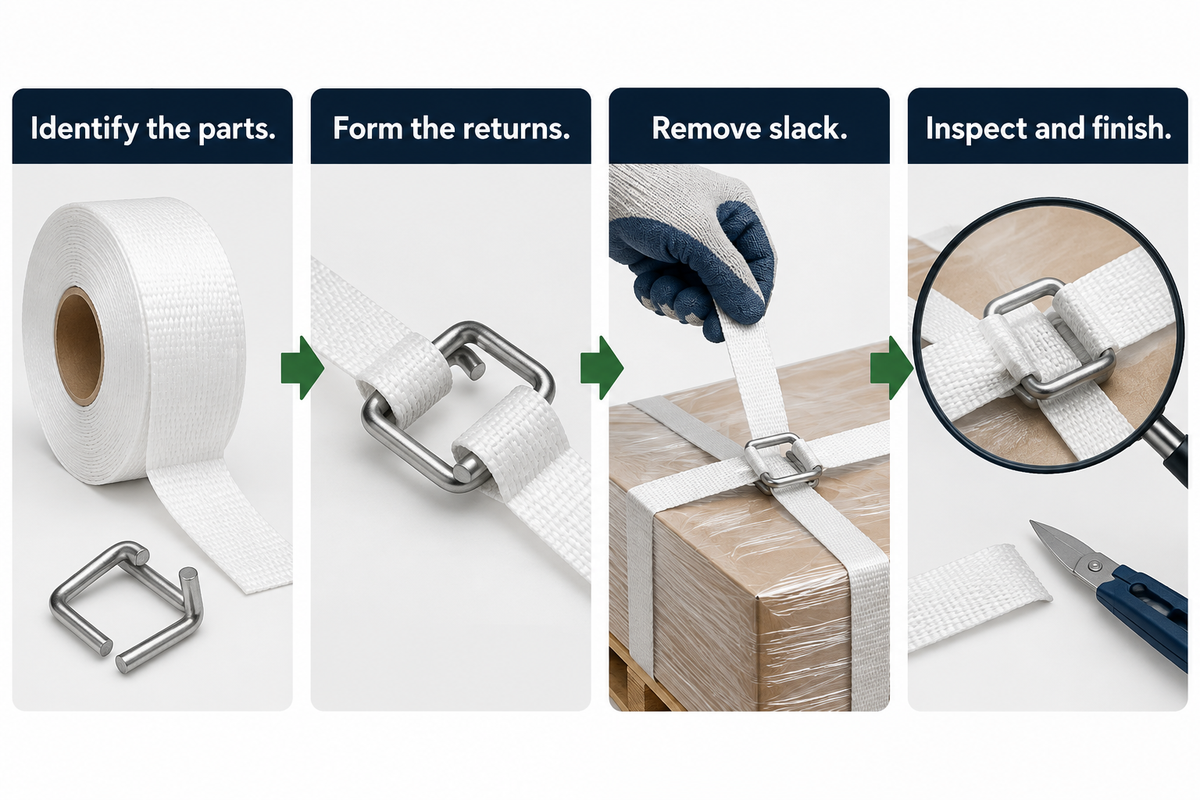
To thread a packaging buckle, follow the instructions carefully to form return loops around the legs or bars shown, removing slack before final tightening. For folding-leg plastic and open-top wire buckles, different methods apply. Be sure to work on a stable package with the correct strap and keep loose ends identified during the process.
How do you use plastic strapping buckles?
For a matching plastic dog-bone buckle, use the two-loop method to secure the strap around the package and form opposed loops, then pass them through the center, fold a buckle leg in each, and pull the loops back against the leg. Center and flatten the band before tensioning. Other molded designs may have different locking features.
Tegral’s poly-buckle demonstration shows this folding-leg design. Its written sequence shows approximately 60 cm of extra cut length and protrudes each loop about 4 cm, before folding the legs. Those measurements describe that method. They are not an instruction to leave a 60 cm finished tail. A loop caught beside a leg instead of around it needs remaking before tension is applied.
How do you use wire strapping buckles?
Use the loop-and-tine method for the illustrated open wire buckle: make a loop in the free end, feed it through the back of the buckle, and place it around the first leg. Wrap the strap around the load and repeat at the second leg. Pull the adjustable band to remove the slack, then use the matched tensioning method.
PAC’s wire-buckle demonstration starts with a loop of about 6 in. That is approximately 152 mm, and it describes the starting loop rather than a universal tail rule. Lay the returned layers flat; do not trap a folded edge under another layer. Tighten and cut in the sequence specified for the system, once the connection has been formed and inspected.
- Identify the parts. Match the strap label, buckle geometry and intended threading diagram.
- Form the returns. Follow the plastic or wire sequence without crossing the band.
- Remove slack. Seat the loops before applying final tension.
- Inspect and finish. Check contact and damage before trimming by the specified method.
If a new buckle does not accept the familiar path, stop at identification. Forcing the old threading sequence on a different geometry makes later tightening and slip checks more difficult to interpret.
Hand Tightening, Tensioners and Re-tensioning
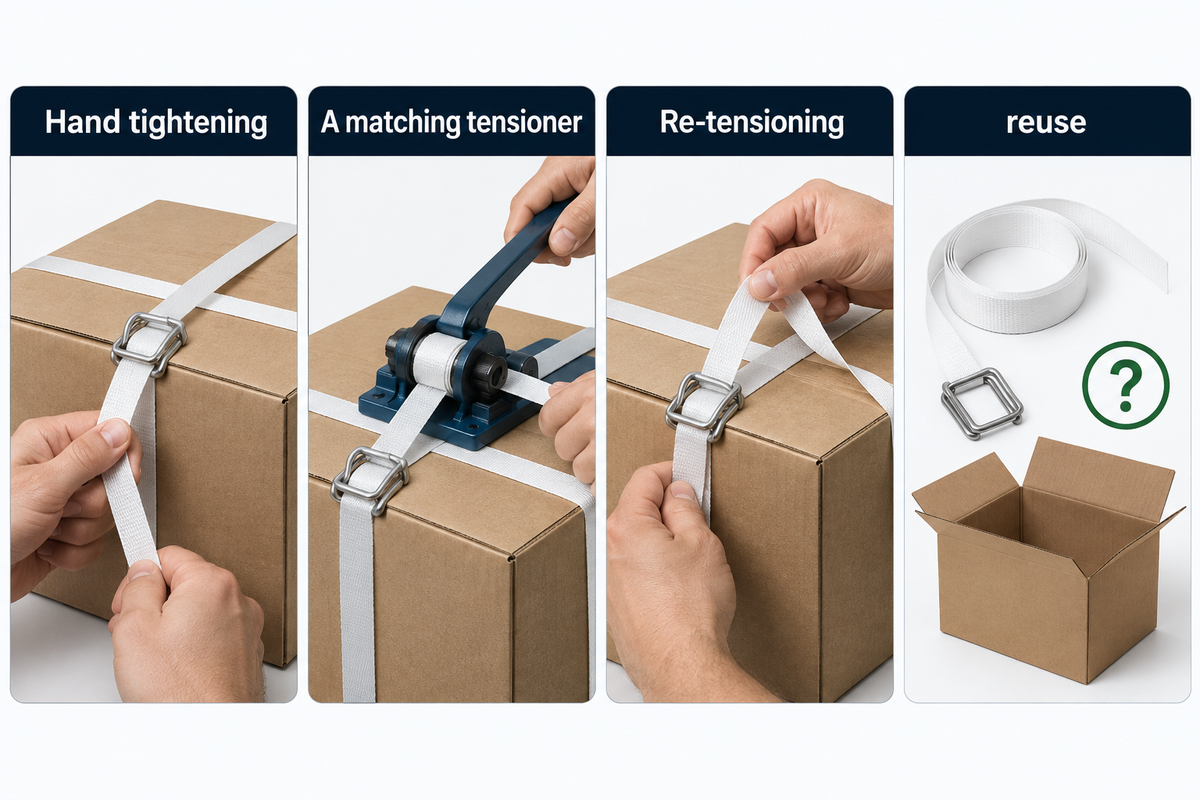
Hand tightening removes loose strap and seats a buckle connection on a pallet or package. A matching tensioner then applies controlled tension where that system calls for a tool. Re-tensioning adjusts a connection, while reuse starts a new connection with previously used components. These are different actions, and permission to do one does not grant approval to do the other.
Keep the working section of the tool clear of corners and obstructions. A band can feel tight next to a tensioner, but friction may limit movement around the package. Starting directly against the buckle may also lead to inadequate working travel. Our strapping tensioner guide explains more about the equipment task.
Tool compatibility has its limits. In a June 2026 Packaging Digest report on the BXT Go, the named model supports PP and PET in 1/2 in and 5/8 in sizes. A width marked on a buckle is not a substitute for a tool’s specified band material and operating range.
Drying lumber shows why later slack needs investigation. In a 2012 Forestry Forum discussion, user Ohio_Bill described banding loosening as timber dried and tightening the buckles again. This is a good observation about a changing bundle, and not a general instruction for reuse. Re-tension a connection only as defined in the system and with the bundle stable. See our guidance on reuse of plastic strapping for more information, before starting a new application.
Why Strapping Buckles Slip: A 9-Symptom Fault Map
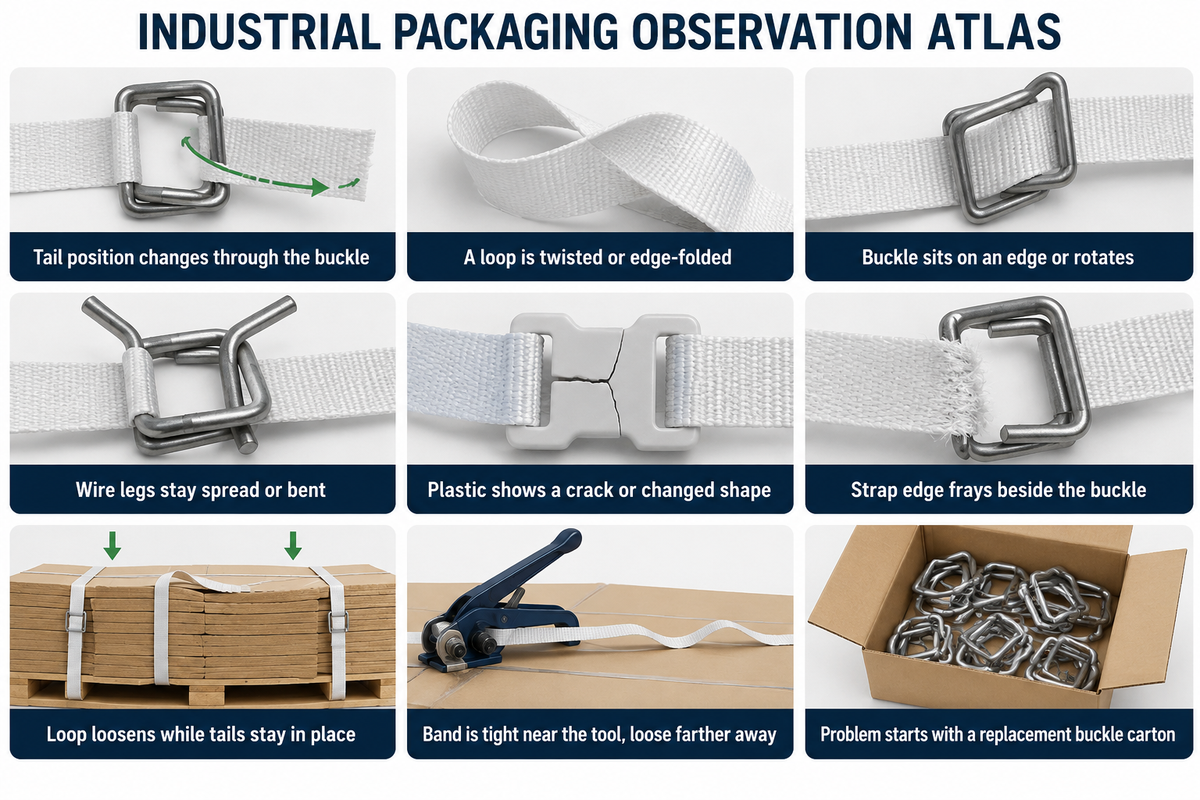
Strapping buckles can come undone when the return path is wrong, the strap and buckle are not matched, or contact surfaces and parts are damaged. A loose package can also occur from settling or relaxation of the strap. Compare the tail position, the shape of the buckle, and the dimensions of the package before increasing the tension. The same loose-loop appearance can be caused by several things.
Use the map below to choose the next inspection, rather than declaring a cause from one symptom. Observe a controlled test. Do not remove a restraint from an unstable package to check it. ASTM D4675 treats friction, geometry and strapping performance together when planning evaluation.
| Observation | Possible mechanism | Next check or action |
|---|---|---|
| Tail position changes through the buckle | Strap is moving at the connection | Compare the complete return path with the correct diagram. |
| A loop is twisted or edge-folded | Uneven seating on a leg | Remake the unloaded setup with flat, centered layers. |
| Buckle sits on an edge or rotates | Skewed path or unsuitable position | Inspect alignment and the contact surface beneath it. |
| Wire legs stay spread or bent | Permanent deformation or mismatch | Replace the damaged part and review the matched system. |
| Plastic shows a crack or changed shape | Damaged buckle body or leg | Replace it; do not glue or reshape it for another trial. |
| Strap edge frays beside the buckle | Abrasion, a rough contact or pinching | Inspect both the strap path and buckle contact points. |
| Loop loosens while tails stay in place | Bundle settlement or strap relaxation | Compare package dimensions and strap condition. |
| Band is tight near the tool, loose farther away | Restricted movement along the path | Inspect intervening edges and the tool’s working travel. |
| Problem starts with a replacement buckle carton | Part, finish or wire section changed | Compare part codes and dimensions with the retained sample. |
Separate a moving tail from a shrinking package before choosing the remedy. More pulling force is a poor choice if the leg is cracked or the band is cut. Keep observations with the packing record so the next person can see what changed.
Checking a Completed Buckle Joint
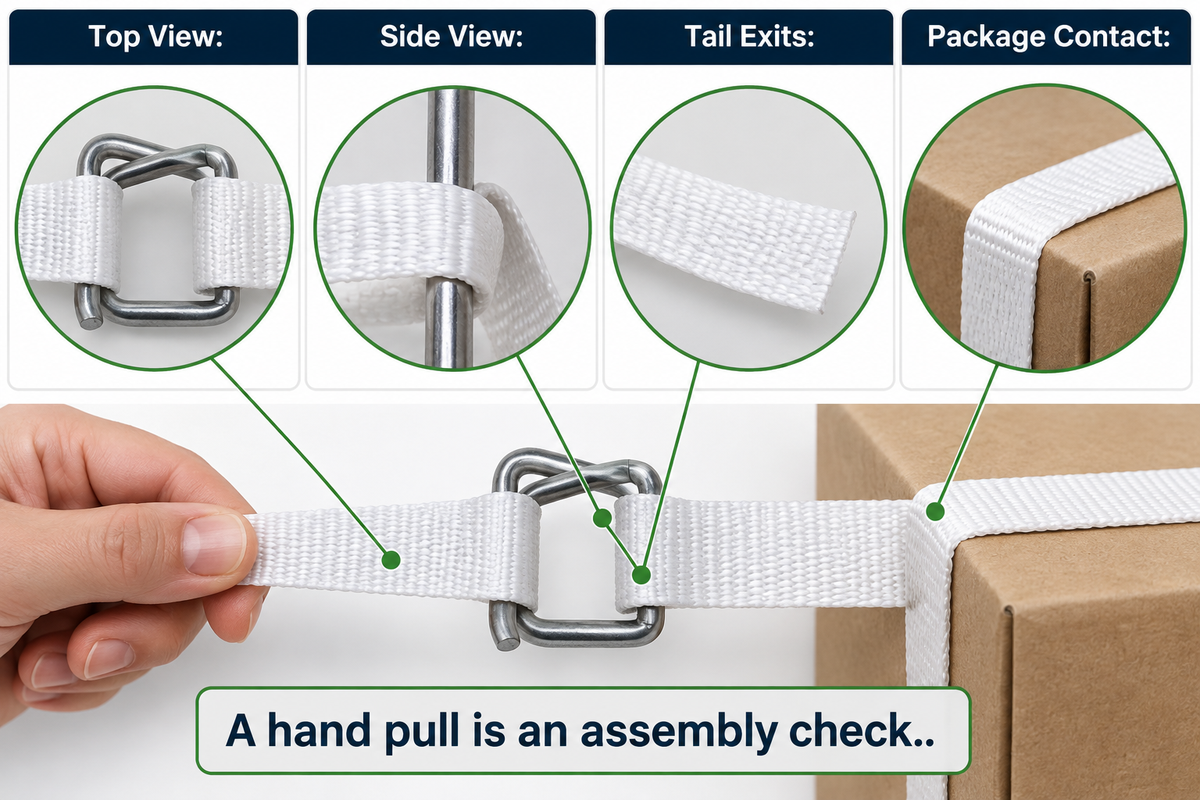
Check a completed buckle joint for the intended return path, centered strap contact, stable seating and damage. Check the exits and the legs and inspect the band where it contacts the package. A hand pull is an assembly check. It does not measure joint strength or demonstrate how the complete package behaves in distribution.
ASTM D3950-23 presents breaking strength and elongation separately from joint strength. For strap, keep the test result and joint-system result separate. A strong band can still have a poor connection, and a good connection can be found on packaging that compresses or allows movement.
“Thorough user testing is essential”
- Top View: both returns follow the proper path without crossing.
- Side View: The strap contacts the correct legs or bars, and there is no edge trapped under it.
- Tail Exits: The adjustable end is of the length required by the part’s procedure and remains identifiable.
- Package Contact: edges and surfaces do not cut or pinch or destabilize the band.
If measuring joint strength of a strapping system, please refer to strapping Joint Strength. For a varied packaging system, please refer to the Package Testing Guide for strapping Changes.
Storage, Reordering and Changes to the Buckle System
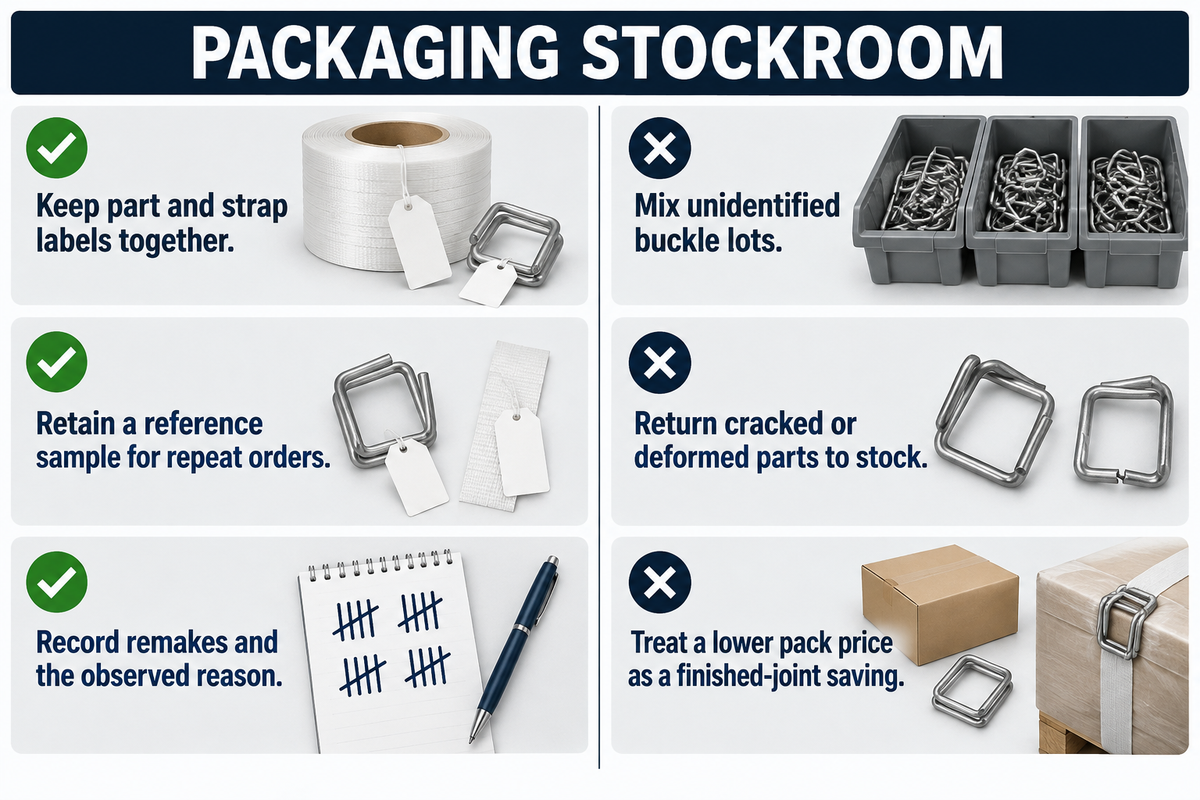
Store buckles to maintain their identity and condition (retain part code, strap pairing and lot information; protect from contamination and physical damage). Upon reorder, take into consideration geometry and finish and nominal width. Keep damaged, mixed and unidentified parts away from the active packing station until resolved.
For a new packing project or warehouse replenishment, keep one labeled reference sample with the strap specification. Wire diameter should be recorded, if applicable. Record the buckle shape and finish. Provide illustration of tooling and threading of the buckle. That record gives staff a means to trace a changed joint and gives a repeatable description to purchasing.
Refer to International Safe Transit Association guidance on retesting to consider closure and straps among packaging components. Under that guidance, a change that can affect packaged-product performance calls for renewed testing; a change unrelated to performance has an exception.
Cost per Completed Buckle Joint
Example: make 1,000 completed joints using $0.12 of strap and buckle per first attempt, 20 seconds of labor per joint, and labor at $24 per hour. Assume 20 joints each need one remake, consuming another $0.12 of material and 30 seconds of labor.
Initial material costs $120. Initial labor costs 1,000 × 20 ÷ 3,600 × $24 = $133.33. The remakes add $2.40 of material and $4.00 of labor. Total cost is $259.73 per 1,000 completed joints, or about $0.260 per joint. Count actual remakes once; do not divide by a success rate unless your retry model calls for it. This lets finance compare a pack price with the work needed to finish the job, while quality decides whether the joint is acceptable.
Do
- Keep part and strap labels together.
- Retain a reference sample for repeat orders.
- Record remakes and the observed reason.
Don’t
- Mix unidentified buckle lots.
- Return cracked or deformed parts to stock.
- Treat a lower pack price as a finished-joint saving.
A successful economical closure is one which creates an acceptable completed joint, with a workable application process. For durable, heavy duty, or other shipping applications, the complete strap-and-buckle combination is more important than the words on the box.
Strapping Buckles FAQ
Which strapping buckle is best?
A matched plastic buckle suits light-duty hand-applied PP; a specified wire buckle suits its approved PP or cord system.
Start with the construction of the strap already selected for the package. Then match width, buckle geometry, surface treatment and application method. Flat extruded PET and woven polyester cord need separate identification even though both use polyester. For a repeat order, retain the existing part code and reference sample instead of choosing by a photograph. The best choice is the one specified for that complete combination.
Are strapping buckles safe?
Strapping buckles can form suitable packaging joints when the parts, threading and application are correctly matched.
Inspect the buckle, strap and contact with the package before handling the load. Keep damaged parts out of service, and follow the system’s tensioning and release procedure from a stable working position. Package bundling and vehicle cargo restraint are different tasks. A buckle described as strong or heavy duty is not, by that wording alone, a rated road-transport tiedown or lifting component.
Can strapping buckles be repaired?
Replace cracked plastic buckles and permanently bent, damaged or corroded wire buckles rather than repairing them for service.
Glue, heat or bending a leg back into shape changes the contact arrangement without restoring a known product condition. A new buckle also needs the correct strap and threading; replacement alone will not cure a mismatched system or a damaged band. Keep the removed part for investigation, label the observed problem, and compare the replacement with the specified geometry before another controlled application.
Do wire buckles need a crimping tool?
Ordinary open wire buckles hold through threading rather than a crimping operation.
A compatible tensioner may still be used to tighten the strap. Metal seals are a different closure and require their own forming tool. Keep those joining operations separate when preparing the packing station.
How long should the free strap tail be?
Use the tail length specified for the exact buckle and threading procedure; starting-loop dimensions are a different quantity.
PAC’s wire-buckle instructions begin with a loop of about 6 in, approximately 152 mm. Tegral’s plastic dog-bone method instead cuts strap approximately 60 cm longer than the package perimeter and feeds loops about 4 cm through the opening before folding the legs. One number describes a starting loop, another a cut-length allowance, and another the protruding loop during assembly. None is a universal finished-tail requirement. Keep enough material to complete the specified return and tightening sequence, then trim according to the system instructions. When a different buckle replaces the old one, use its own drawing rather than copying the previous tail by eye. An operator comparing instructions should first label what each measurement refers to: loop, extra cut length, or finished free end. That avoids treating unlike measurements as conflicting recommendations.
Match the buckle to your packing task
Send the strap type and width, the buckle reference or a clear photograph, and the package application to UD Packaging. We supply PET strapping and packaging accessories. Include the tool and any observed slipping or damage so the conversation starts with the actual combination.
References & Sources
- ASTM International: D4675-14a(2022), Standard Guide for Selection and Use of Flat Strapping Materials, public sections 1.3 and 4.1.
- ASTM International: D3950-23, Standard Specification for Strapping, Nonmetallic (and Joining Methods), public abstract.
- National Institute of Standards and Technology: Guide to the SI, Appendix B, Conversion Factors.
- Lisa McTigue Pierce, Packaging Digest: New Battery-Powered Strapping Tool Offers Ergonomic, Sustainable Option, June 16, 2026.
- International Safe Transit Association: When should a packaged-product be retested?